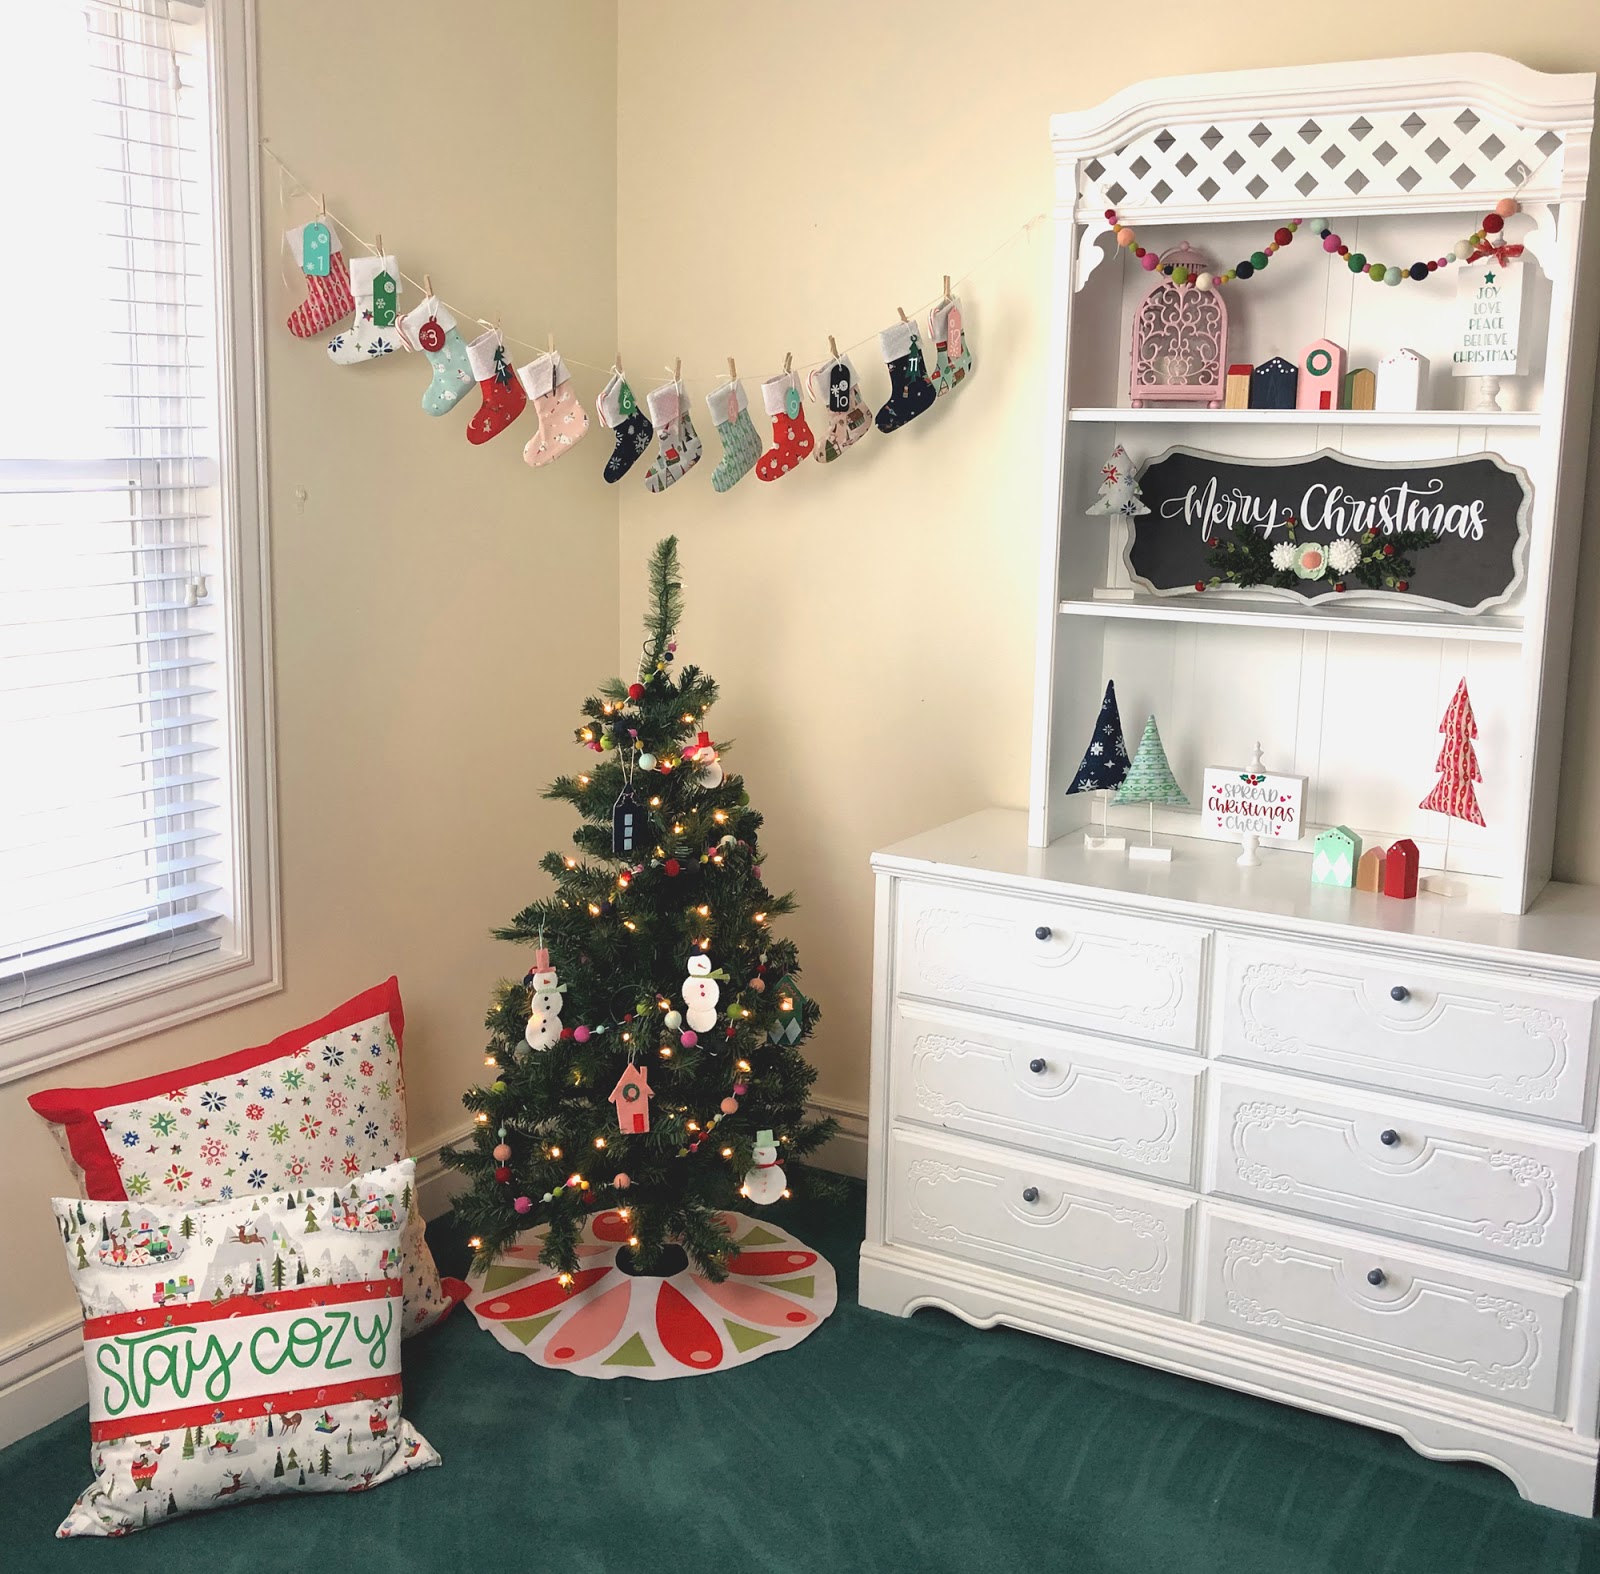
This past summer we sold our home and moved in with my in-laws. It has been a wonderful opportunity for us, but it means that many of our things, including our holiday decorations have been put into storage. And, since I don’t have the main living part of the house to decorate, I decided I could finally get around to making some holiday crafts to decorate my daughters’ shared bedroom. This DIY your holiday makeover is brought to you by Cricut, but the projects and opinions about the products I have used are mine. Everything from the ornaments on the tree, the tree skirt, stocking countdown, pillows, stuffed trees and the art were made by me and all used the Cricut Maker in some capacity. Prepare yourself for image overload, I couldn’t help but try to capture all the cute details in this room! And, I share the file and steps to make your own felt ornaments- they are super easy and fun!
*this post contains affiliate links

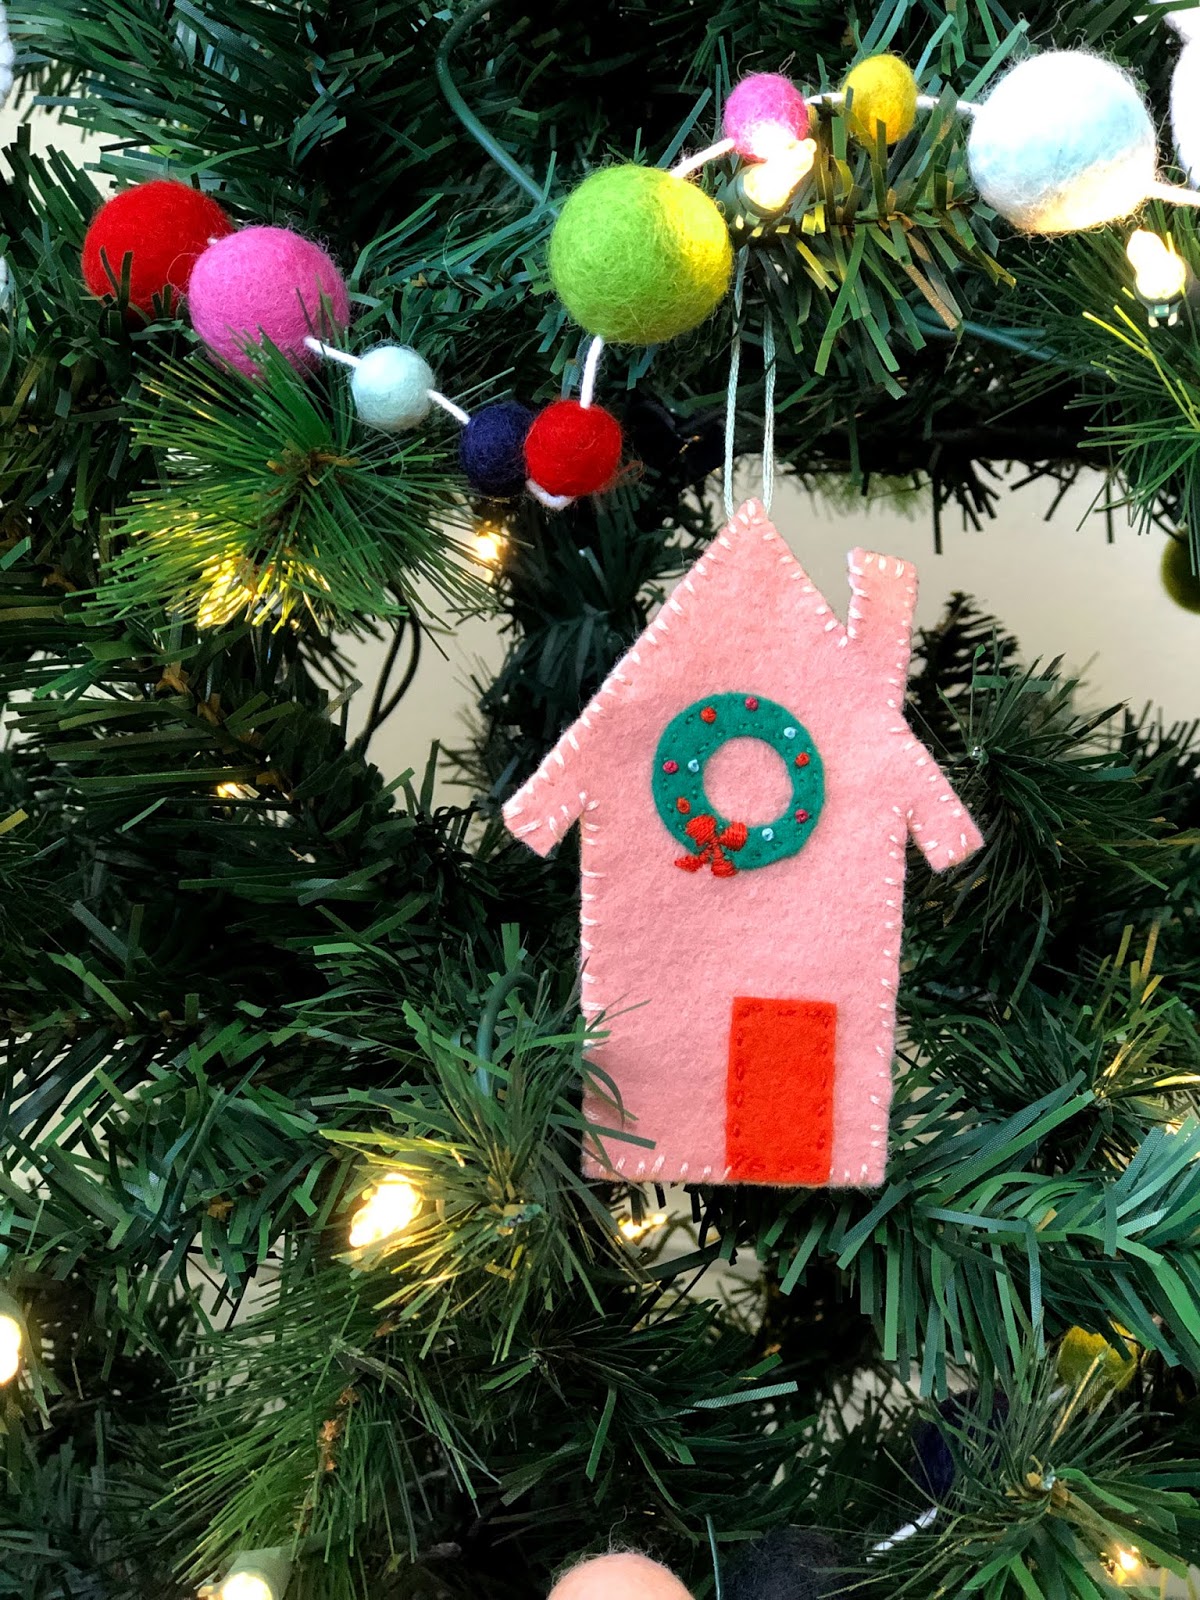
I had the little wooden houses cut out years ago, but never got around to finishing them. I’m so glad I had them ready to paint and embellish with a few pieces of vinyl to mimic the house ornaments inspired by the fabric, which is Way Up North by Jill Howarth for Riley Blake Designs. The stuffed trees were made just like I shared here. You can find the file in design space for these specific shapes here. One tip to share is don’t over fill your trees with batting, it will distort the shape, especially on the points. Put enough in them to give them shape and hold them up, but don’t make them too stiff!
You can also find the Spread Christmas cheer, tree shaped word art, and Merry Christmas cut files on Design Space.

You can find the tutorial for the felt pine boughs on my Instagram page under the highlights!

The tree is by far my girls’ favorite thing! They were so excited to have the lights on all night and I love the cozy feeling it gives their room! The felt ornaments are a blast to make using the Cricut Maker and I don’t have to worry about them breaking.
A couple of tips for choosing which images to use to make your own felt ornaments- pick simple shapes. The rotary blade can only cut so small, make sure you aren’t going to damage your mat! Also, tiny, thin details may be lost when cutting and pulling the image off the mat- you might need to beef up those areas- I had to go back in and make the brims of the snowmen’s hats a bit thicker. You can totally make these no-sew by backing the felt with heat n bond first, but personally, I love the added embroidery details! Here’s the low-down on how to make your own:

Select the image you want to cut out. If you want to make the houses I made, you can find the file in Design Space here. You will need one solid shape for the back of your ornament and then the front and any details you want to add. If you are making this a no-sew project, add your heat n bond BEFORE cutting out the shapes- but DO NOT add it to the ornament back.

Cut out your shapes on your maker. I love the rotary blade for felt! I like using wool blend felt, but you can also use Cricut felt or acrylic felt as well.

Arrange the details you are adding to the ornament and stitch them down. Add any additional embroidery details at this stage.
Make a hanger for your ornament using ribbon or twine. I just used a length of embroidery floss and tied the ends together to make a loop.

Place the loop between the back of the ornament and the front (that now has all details sewn on) and stitch around the entire ornament, making sure to secure your hanger well. ** If you are doing the no sew version, place the back on your fusing surface (i.e. the ironing board) arrange the loop where you want it, place the front of the ornament and any details you are adding and THEN Fuse! The Easy Press 2 makes this process super easy- I use the temp set at 305 and then set the times according to the manufacturers instructions on your fusible adhesive.

The tree skirt is one of My favorite parts! I shared the tutorial on how to make it over on the ThermoWeb blog here.
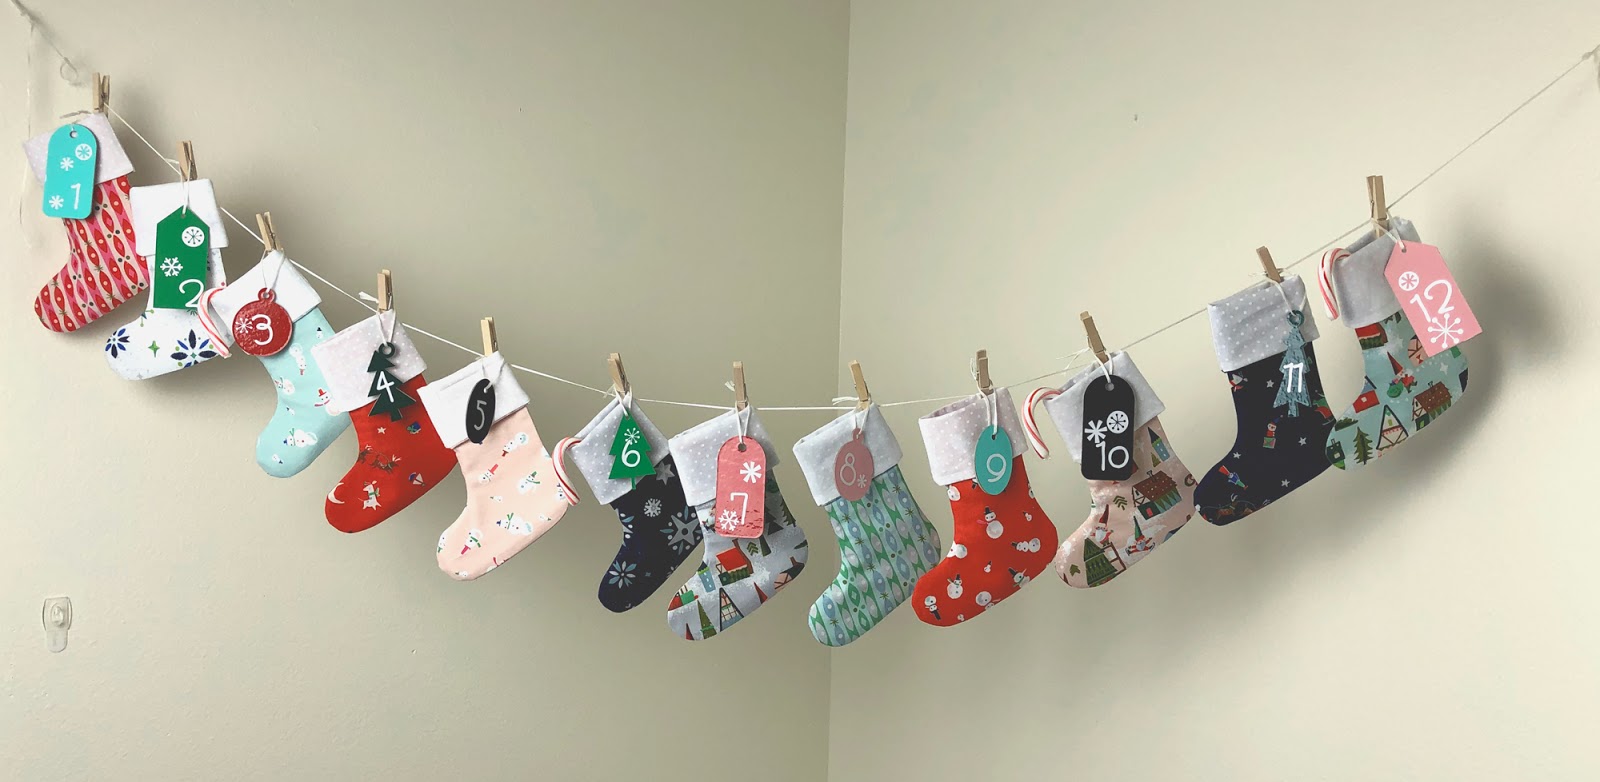

The stocking countdown was a cute way to show off the fabrics of this darling line! I used chipboard covered with vinyl to make the numbered tags. I’m excited to fill them with little treats, activities and gifts for my girls to build excitement for Christmas!

The last project I made was this darling pillow set. I almost decided not to make them as I was running out of time, but I’m so glad I pushed through! I can just see my girls snuggling up with a blanket and a book next to their tree. You can see how I made the Stay Cozy banded pillow in this tutorial.
I hope you enjoyed this tour of my daughters’ Holiday bedroom makeover! They are delighted with it, which makes it super fun for me! If you have any questions, please don’t hesitate to send me an email- and for more details and tutorials, follow me on Instagram– I love hanging out there!
As the pillow says: Stay cozy my friends!
xoxo,
Amy
This is a sponsored conversation written by me on behalf of Cricut. The opinions and text are all mine.


