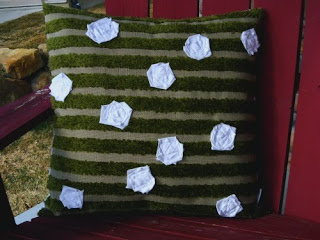
 When I first saw this chenille fabric in the clearance section of JoAnn’s I knew exactly what I would use it for. It reminded me of early spring, when there’s still dirt on the ground, but things are turning green, promising lush beauty to come. The fact that it was an additional 50% off was a bonus.
I thought I’d share with you how I made the flowers- in case any of you wanted to try to make one of these yourself. You will need a 1 1/2″ strip of fabric, approx 18″ long. I ripped my strip on both sides so it would be frayed.
 This process is VERY technical {or not}. I’ll try to describe it, but really the best advice I could give is to just try it a few times until you like the result. {I tried swapping the fabric hoping it would make it easier to see the turns, I’m afraid it didn’t help much}
 Eventually you will end up unfolding the strip to make the turns easier- just go with it. When you are satisfied with your flower, tuck the raw end under the flower and place it on your fabric to be sewn down.
 This is the best shot of the stitching I could get. You can kind of see that there are two rectangular-ish shapes sewn in the middle, offset from each other. Try to catch any loose ends {especially the center part} but don’t sew too heavily, you want the flower to fluff a little.


linked up to Flamingo Toes’ Think Pink link party!


Gwen @ Gwenny Penny
March 10, 2011 at 3:13 amHow do you find room for both your family and all of your pillows under one roof? Very interesting fabric… When I first saw the picture I thought "What is she doing with astro-turf?" 🙂 Oh, and the flowers are really cute, too.
Amy @ Increasingly Domestic
March 10, 2011 at 7:22 amAmy, you are so good at coming up with unique pillows! I love the inspiration and the little flowers. So cute!
Crafty Girls
March 11, 2011 at 7:37 pmOk, once again…super cool pillow! Love it! I wish we lived closer so I can come and play at your house and check all these pillows out in person! Pictures never seem to do our creations justice! Have a great weekend!
AllieMakes!
March 13, 2011 at 10:55 pmCute! Thanks for teh tutorial!
That is FUN green fabric!
Thanks for linking up to Making It With Allie! I can't wait to see what you have for next week!
AllieMakes.Blogspot.com
this blessed nest
March 19, 2011 at 6:31 pmwhat a fun pillow!
i love your style of rosettes as well. those rolle rosettes take FOREVER to do.
such a fun pillow.
thanks so much for linking up with the SPRING FLING!
have a super weekend.
xo
kellie