
I decided that my little ruffle pillow needed a friend. I like my pillows to have buddies! So I have been sitting on this idea for a while, and decided I needed to put it to the test last night. I started at about 9 pm and finished up after 11. Not too terribly long, but longer than I wanted to be up!
The stripes are made with the same fabric I used for the fan ruffles on the other pillow. It’s from Ikea. I was going to do a whole picture tutorial, but after I got going I realized I was doing it much different than I would if I ever had to make one again so I stopped taking pictures. I do have a couple relevant photos from the “making of” portion and some directions and tips if you want to make your own.
Originally I was going to make an 18″ pillow. I didn’t make my strips long enough and ended up with a 16″ pillow. I think it works better with my other pillow since it’s so small, so it was a happy accident.
To make your pillow you will need a base fabric and an accent fabric. I really like the shiny, sheer effect of this pillow, but I think it would also be cute (and much easier) with a cotton for the accent. Decide what size pillow you are going to make and measure the length of the diagonal of that shape. (I know there is a mathematical way to figure out the hypotenuse of the triangle- Gwen- any suggestions?) but I just measured it out. (actually, I didn’t measure it out, I just guessed and that’s why my pillow had to be 2″ smaller) Take that length and add 2 inches, this will give you plenty of breathing room. Cut 3 strips of base fabric 4″ wide by the length you measured, and 4 strips 5″ wide by the length you measured. Then cut 3 strips of your accent fabric 4″ wide by two times the length you measured. Run gathering stitches along both sides of each accent strip.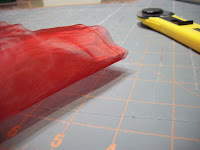
Finally- a relevant picture! Take your accent strip and fold it in half, pinch to make a crease. Do the same thing with your 4″ wide base fabric. Match up the creases and pin with right sides facing up on both pieces.
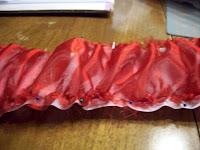 Gather up the sides of the accent fabric and pin along the base fabric. It will look like this. (a note, the center strip is the only one that needs to be gathered the entire length of the base strip, the outer edges will be cut significantly and really only need to be gathered in the center, so don’t spend all day gathering pieces that will get cut off. Use a ruler or template of the finished pillow to determine how long your gathered pieces need to be on the sides.)
To make your pillow you will need a base fabric and an accent fabric. I really like the shiny, sheer effect of this pillow, but I think it would also be cute (and much easier) with a cotton for the accent. Decide what size pillow you are going to make and measure the length of the diagonal of that shape. (I know there is a mathematical way to figure out the hypotenuse of the triangle- Gwen- any suggestions?) but I just measured it out. (actually, I didn’t measure it out, I just guessed and that’s why my pillow had to be 2″ smaller) Take that length and add 2 inches, this will give you plenty of breathing room. Cut 3 strips of base fabric 4″ wide by the length you measured, and 4 strips 5″ wide by the length you measured. Then cut 3 strips of your accent fabric 4″ wide by two times the length you measured. Run gathering stitches along both sides of each accent strip.

Finally- a relevant picture! Take your accent strip and fold it in half, pinch to make a crease. Do the same thing with your 4″ wide base fabric. Match up the creases and pin with right sides facing up on both pieces.
 Gather up the sides of the accent fabric and pin along the base fabric. It will look like this. (a note, the center strip is the only one that needs to be gathered the entire length of the base strip, the outer edges will be cut significantly and really only need to be gathered in the center, so don’t spend all day gathering pieces that will get cut off. Use a ruler or template of the finished pillow to determine how long your gathered pieces need to be on the sides.)
Once your first *center* strip is gathered, take one of the 5″ wide base pieces and put it on top of the gathered piece, right sides together. Sew using a 1/2″ seam allowance. Fold the base fabric back and top stitch down the seam allowance on the top. Repeat with the other side of the center strip. Then repeat the process for the two side strips. Your finished piece should be base, accent strip, base, accent strip, base, accent strip, base. Cut out the pillow front from this finished piece, centering the corners on a diagonal from the center accent strip. I found it easiest to cut out a template of the pillow front and use that to cut out the pillow. When cutting the corners of the center strip, you will want to pin down the gathers, since you will be cutting off the stitching that holds them in place. Alternatively, you could put the back of the pillow on the piece of fabric, sew around leaving an opening for turning and then trim out the excess fabric- this will save worrying about the gathers getting loose. Stuff the pillow, close as desired and you’re done. I made a lot of mistakes, but I really like it and my kids adore it. It was my 7 year old son who named it the candy cane pillow! Now I can get it out of my head and just leave it on the couch ;)!
![]()


FrouFrouBritches
December 7, 2010 at 6:54 pmThat is precious! I love that it's candy cane without the hook shape. So cute! Love it!
Michele {The Scrap Shoppe}
December 7, 2010 at 7:40 pmThis is so adorable! I love it! Thank you so much for linking up to Homemade Christmas. 🙂
Naturally Carol
December 8, 2010 at 6:12 amThat pair look like a lot of holiday fun! What a great buddy to the ruffley pillow.
AmericKim
December 8, 2010 at 6:23 amI love this pillow!! Did you say you got the fabric at Ikea? Perhaps I need to re-read…
Char @ Crap I've Made
December 8, 2010 at 4:01 pmI love the texture!
Amanda
December 9, 2010 at 3:33 pmI love this! I featured it today on my blog Today's Top 20! I'd love if you could stop by! While your there please click on my water widget on the top right. For each click p&g will donate 1 day's worth of clean water! 🙂 Thanks!
Amanda
todaystoptwenty.blogspot.com
Kelli
December 9, 2010 at 6:35 pmI love this pillow! Co cute!
Gwen @ Gwenny Penny
December 10, 2010 at 5:01 amWay to use hypotenuse in a craft project:) Love the candy cane pillow, Amy. It really goes well with the ruffled pillow. I can see why the kids like it.
AllieMakes!
December 20, 2010 at 5:41 pmLOVE it! It's the sweetest pillow I have layed eyes on this season!
Thanks for linking up to Making It With Allie! I can't wait to see what you have for next week!
AllieMakes.Blogspot.com