
This post was updated from its original version on 3/6/2020. it was originally published 4/1/2017
note: This fabric carrot tutorial contains affiliate links
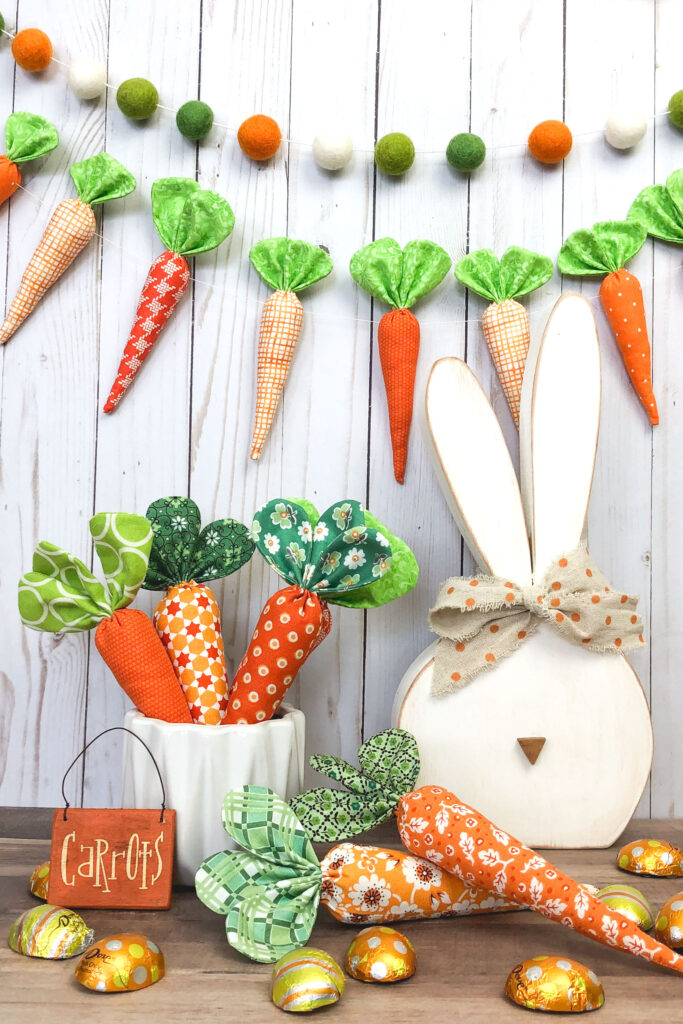
From the moment the first warm breeze hints at the coming of spring, we get antsy for green, growing things and bright happy colors. If you’re like me, you get ready for spring before spring is actually ready to arrive. Creating a bright happy project is just the thing to carry you through the last gasp of winter before the ground begins swelling with new life. Sewing fabric carrots may be just the project you need. They are simple and fun. Don’t be surprised if you end up sewing a whole lot more than you think you really need. *update: if you want to cut these fabric carrots out using a Cricut Maker, you can find the link for the mini carrots here, or the medium carrots here.
Supplies for your Fabric Carrots:
Fabrics- large scraps of orange and smaller scraps of green
Fiber fill or other stuffing material
Sewing machine and tools
Needle and thread
If you want the printable version of the pattern, which includes paper templates for the carrot bodies and leaves in two sizes, you can find it here.
Cutting fabric for the Fabric Carrots:

The first thing you will need to do is decide how big you want your fabric carrots to be. You will need two rectangles in the sizes shown for each carrot. (unless you are making multiple carrots of the same fabric, then see tip below) Fold the rectangle along the length and then cut from the top outer corner to the fold point to create the pennant shape. You can really use any measurement you want, the wider the rectangle, the fatter the carrot, the taller the rectangle, the taller the carrot.
TIP: Cut multiple carrots at once
- First, cut a length of fabric the height of the carrot body you want.
- Then, fold it over so the right sides are facing.
- Finally, use a rotary cutter and plastic ruler, or draw your lines for cutting to create the pennant shape.
- The point of the pennant will be at the half-way point of the width of the top.
- For example: To make the medium size fabric carrots I would cut a length of fabric 9″ wide. Then, I would fold over that piece so the right sides are facing. Next- using a rotary cutter or ruler, measure from one corner at the top, to a marking 1 1/2″ (1/2 of the 3″ width I want) in on the bottom and cut an angled line. From that bottom point, measure over another 1 1/2″ (so you have 3″ from the top corner) and cut your second angled line. Continue this process- measure 1 1/2″ from the last point you cut on the opposite side so you create more pennant pieces that are 9″ tall and 3″ across the top until you reach the end of your fabric piece
Sewing Fabric Carrot Bodies

- Place two body pieces right sides together.
- Now, sew along the two angled sides at 1/4″ seam allowance. Back stitch at the beginning and ending.
- Trim off the fabric around the tip to allow the point to be easier to turn.
- Finish by turning the carrot right side out. Tip* use a blunt, pointy tool (like a chopstick) to push out the point of the carrot.
Sew the Leaves for your Fabric Carrots:

- Cut the green fabric into the size of leaves you want. For the larger fabric carrots I used 2″ X 3″ rectangles, for the smaller ones, I used 2″ X 2″ squares. You need two pieces of fabric for each leaf. For the larger carrots I made 3 leaves, for the smaller carrots, I made 2.
- Round the two top corners of the leaf pieces. (note: the larger leaves are 3″ tall and 2″ wide)
- Sew around three sides of the leaf- leaving the bottom (straight) edge open. I do back stitch at the beginning and ending of each leaf so the stitches don’t pull out when you turn.
- Clip the rounded parts of the leaves. You can use scissors to cut notches out, but I like to just use pinking shears to trim it. Just be careful to not clip your threads.
- Turn the leaf right side out and press.
Assemble your Fabric Carrots:

- Stuff the carrot with fiber. I like my carrots extra firm, but you do you. Leave a bit of space at the top to turn the edges over and add the leaves.
- Fold the top edge of the carrot body over a scant 1/4″ and stitch a running stitch around the top. Bring the thread to the inside of the carrot. Pull the thread to begin to gather the top, but don’t close it all the way- you still need to add the leaves. *tip: I used button thread which is thick and strong, if you use regular thread, just make sure to double it up so it’s strong enough to pull tight to close the top of your fabric carrots.
- Add the leaves. You can either run a gathering stitch along the bottom of the leaves, or fold the leaf and then just push the needle through the bottom- which is what I do. I accordion fold the leaf into fourths and then just add it to the thread. I add all the leaves at the same time. Pull the thread to gather the top of the carrot closed, make sure the bottom of the leaves are all enclosed in the carrot.
- Stitch around the top of the carrot again, catching the leaves as you go to keep them securely in the carrot. Tie off the thread when you are done.

Tie a group of fabric carrots together with a bow.

See- even the Easter bunny loves these fabric carrots!
If you are looking for more Spring Decorating ideas- head over to this blog post for lots of inspiration.
And if you would like more ideas and inspiration right to your inbox, sign up for my newsletter below:
As always, if you have any questions, please don’t hesitate to reach out! I’m happy to help or clarify anything.
Have a wonderful Spring!
xoxo,
Amy


Anne
April 4, 2017 at 1:23 amCute!!! I've got a Craft Gossip post scheduled for tomorrow morning that features your carrot tutorial: http://sewing.craftgossip.com/?p=92348 –Anne
Quilts for Sale
April 4, 2017 at 4:02 pmLove your carrots!
May I have permission to copy a photo to add to my blog. – http://www.mariamichaelsdesigns.com/blog/ – I'll direct my readers here to your pages for the tutorial.
JoAnn Linke
August 4, 2018 at 4:48 pmWonderful tutorial, Thanks for sharing love it
Janet
August 4, 2018 at 4:52 pmLove these fabric carrots! Thanks for sharing your pattern!!!