This post originally appeared on the Riley Blake Designs blog. The fabric was provided by Riley Blake Designs, but the DIY diaper bag pattern is my original design. If you would like the downloadable PDF version you can purchase it for $3 in my Etsy shop here.
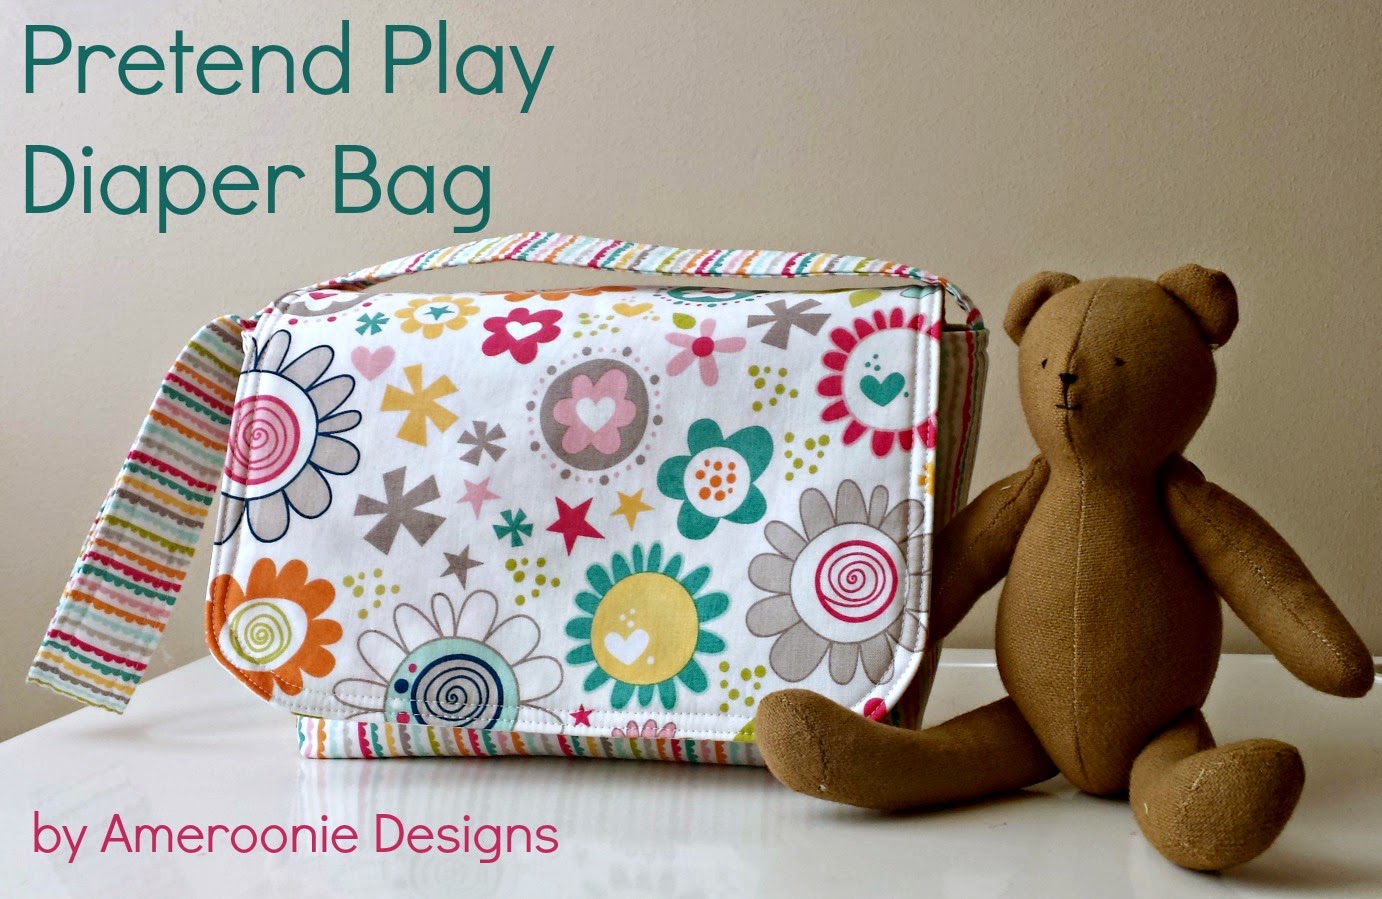
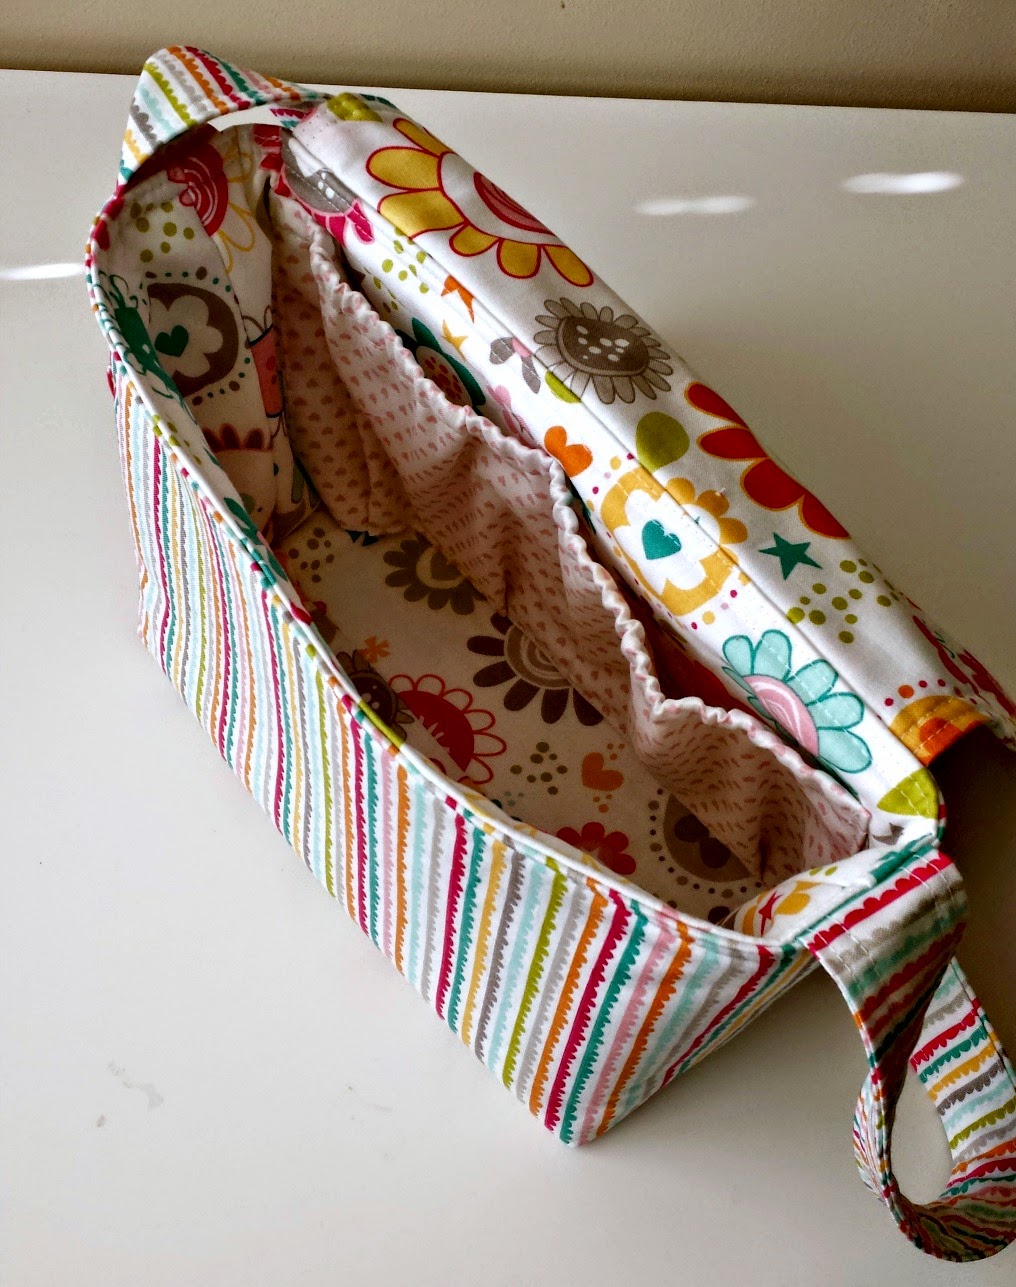
My two year old daughter loves to play with her baby dolls. She rocks them and feeds them and is always changing their diapers. So, I decided that this Christmas, she needed a pretend play diaper bag under the tree, to hold all her baby’s things and really help her feel like the mommy. And if you have a little girl on your list who loves playing at being the mommy too, you’ll love today’s tutorial for this pretend play DIY diaper bag. But even if you don’t have a girl, this bag would be a wonderful tote for any boy to haul all his goodies around, or even to bring over to Grandma’s for a sleepover. I have also designed some accessories for this diaper bag that you can find over on Diary of a Quilter’s blog here. There is also a PDF version of the accessories tutorial version available in my Etsy shop.
Let’s get to making your pretend play DIY diaper bag.
** Please read all directions before beginning.
Supplies Needed for your DIY Diaper Bag:
The fabric used in this tutorial is from the Snapshots line.
You will need 1/2 yard fabric for the exterior of the bag- it is best if you use a non- directional fabric.
1/2 yard fabric for interior and flaps
1-2 fat quarters (optional) for pockets
1/2 yard fusible fleece (40″ wide)
1/2 yard of 1/4″ or 1/2″ elastic
sewing supplies
Cutting the Fabric for your DIY Diaper Bag:
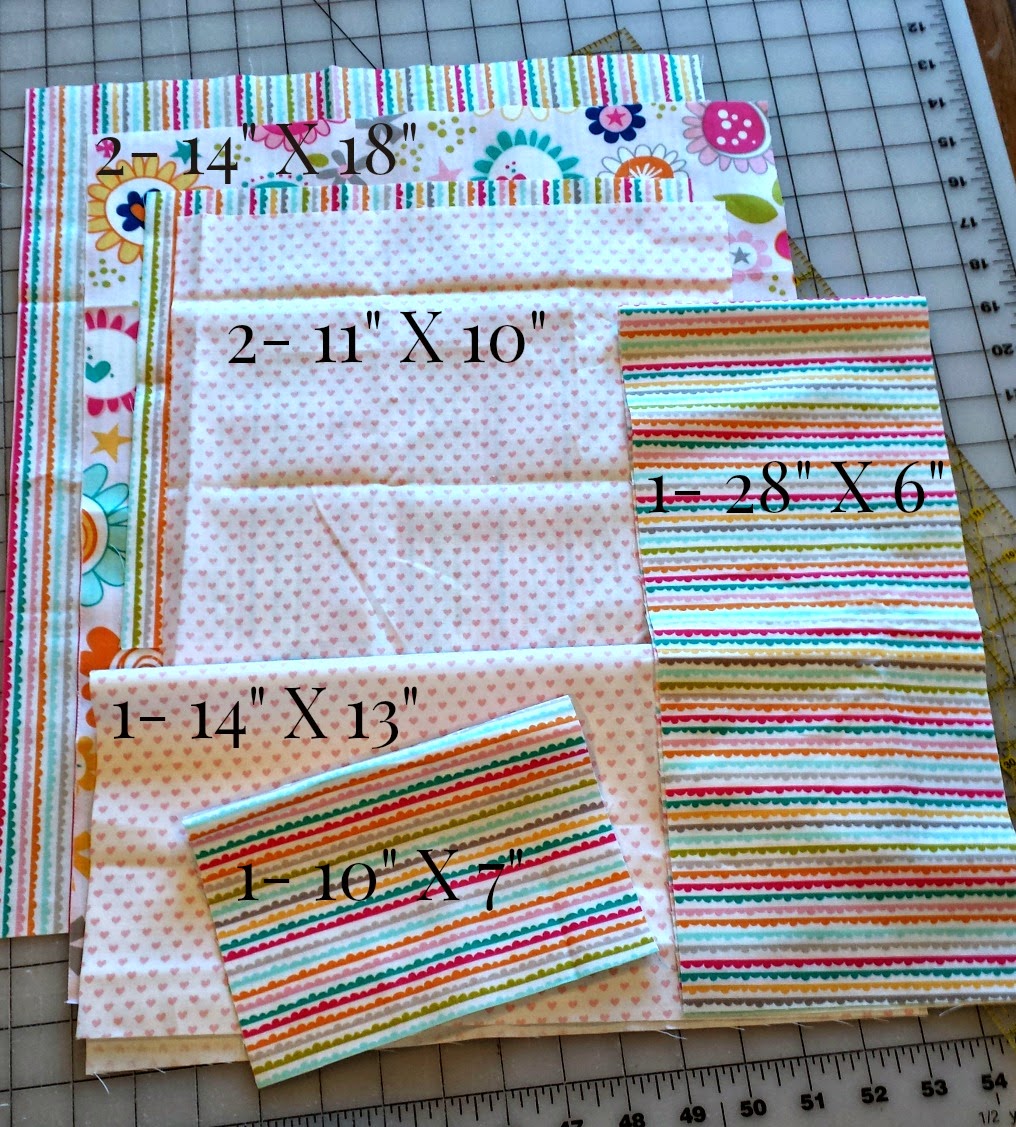
From your exterior fabric you will need:
1- 14″ X 18″ (exterior of bag)
1- 6″ X 28″ (strap)
1- 14″ X 13″ (interior pocket) *
From your interior fabric you will need:
1- 14″ X 18″ (interior of bag)
2- 11″ X 10″ (flap)
1- 7″ X 10″ (side pocket) *
*unless you purchased additional fat quarters for interest, then cut the pocket pieces out of them.
Cutting Fusible Fleece:
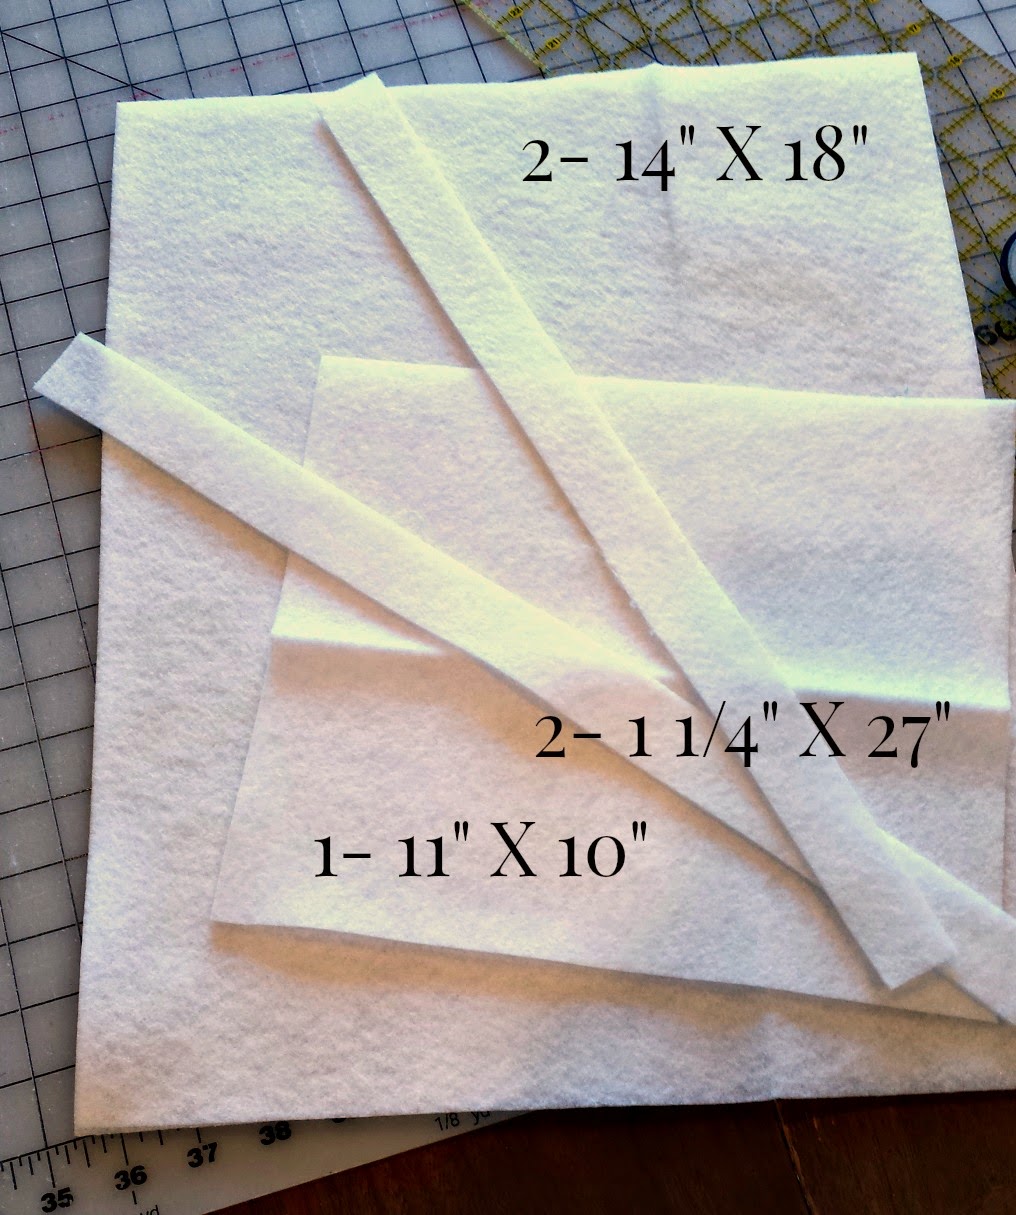
Cut in order:
2- 14″ X 18″
1- 11″ X 10″
1 1/4″ X 27″- when you cut your fleece, you will not have a piece that is 27″ in length, so just cut 2 pieces at 1 1/4″ and over lap them when you fuse them into the strap.
Cut your elastic into 1- 10″ piece and 1- 3″ piece
Go to your ironing board. 🙂
Following the manufacturers instructions fuse the fleece to the wrong side of the exterior and interior bag pieces. Fuse fleece to the wrong side of one of the flap pieces. Take your strap piece, fold in half along the length and press. Open up the strap and bring the sides into the newly pressed center crease- press. Open up one side and lay the fleece along one side of the center crease, overlapping the pieces in the center, with the fusible side of the fleece (the bumpy side) toward the fabric. Fold the side back down and refold the piece along the center crease- press to fuse the fleece to the fabric.
Preparing the Pieces for your DIY Diaper Bag:
*all seam allowances are 1/2″
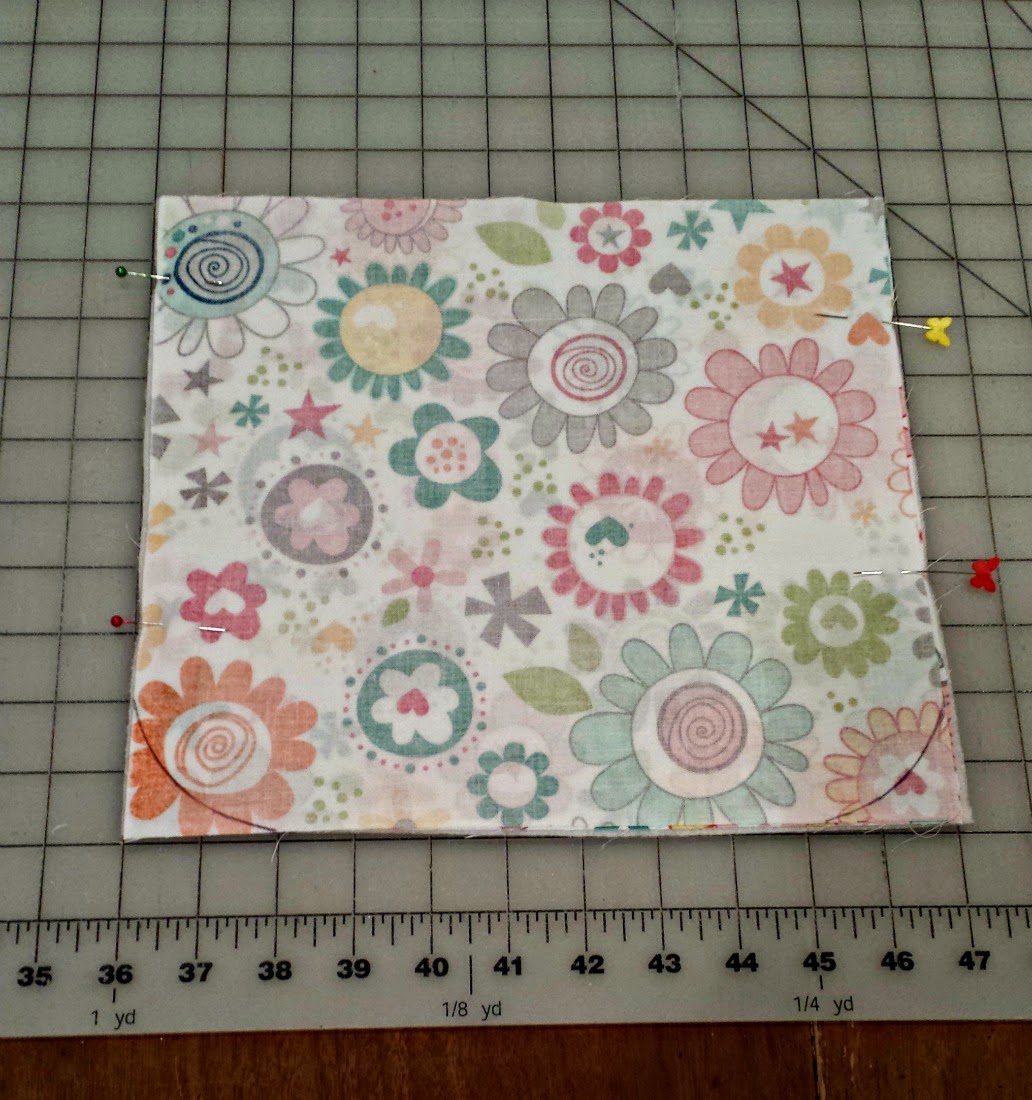
On the wrong side of the flap piece without the fleece, use a lid or mug to round the two bottom corners. Pin the piece to the second flap piece, wrong sides together. Cut along the marked lines to round both pieces. Sew around the three sides touching the rounded corners. Clip around the rounded corners. *one tip is to use pinking shears on the curves, just be sure to not clip your threads. Turn right side out and press.
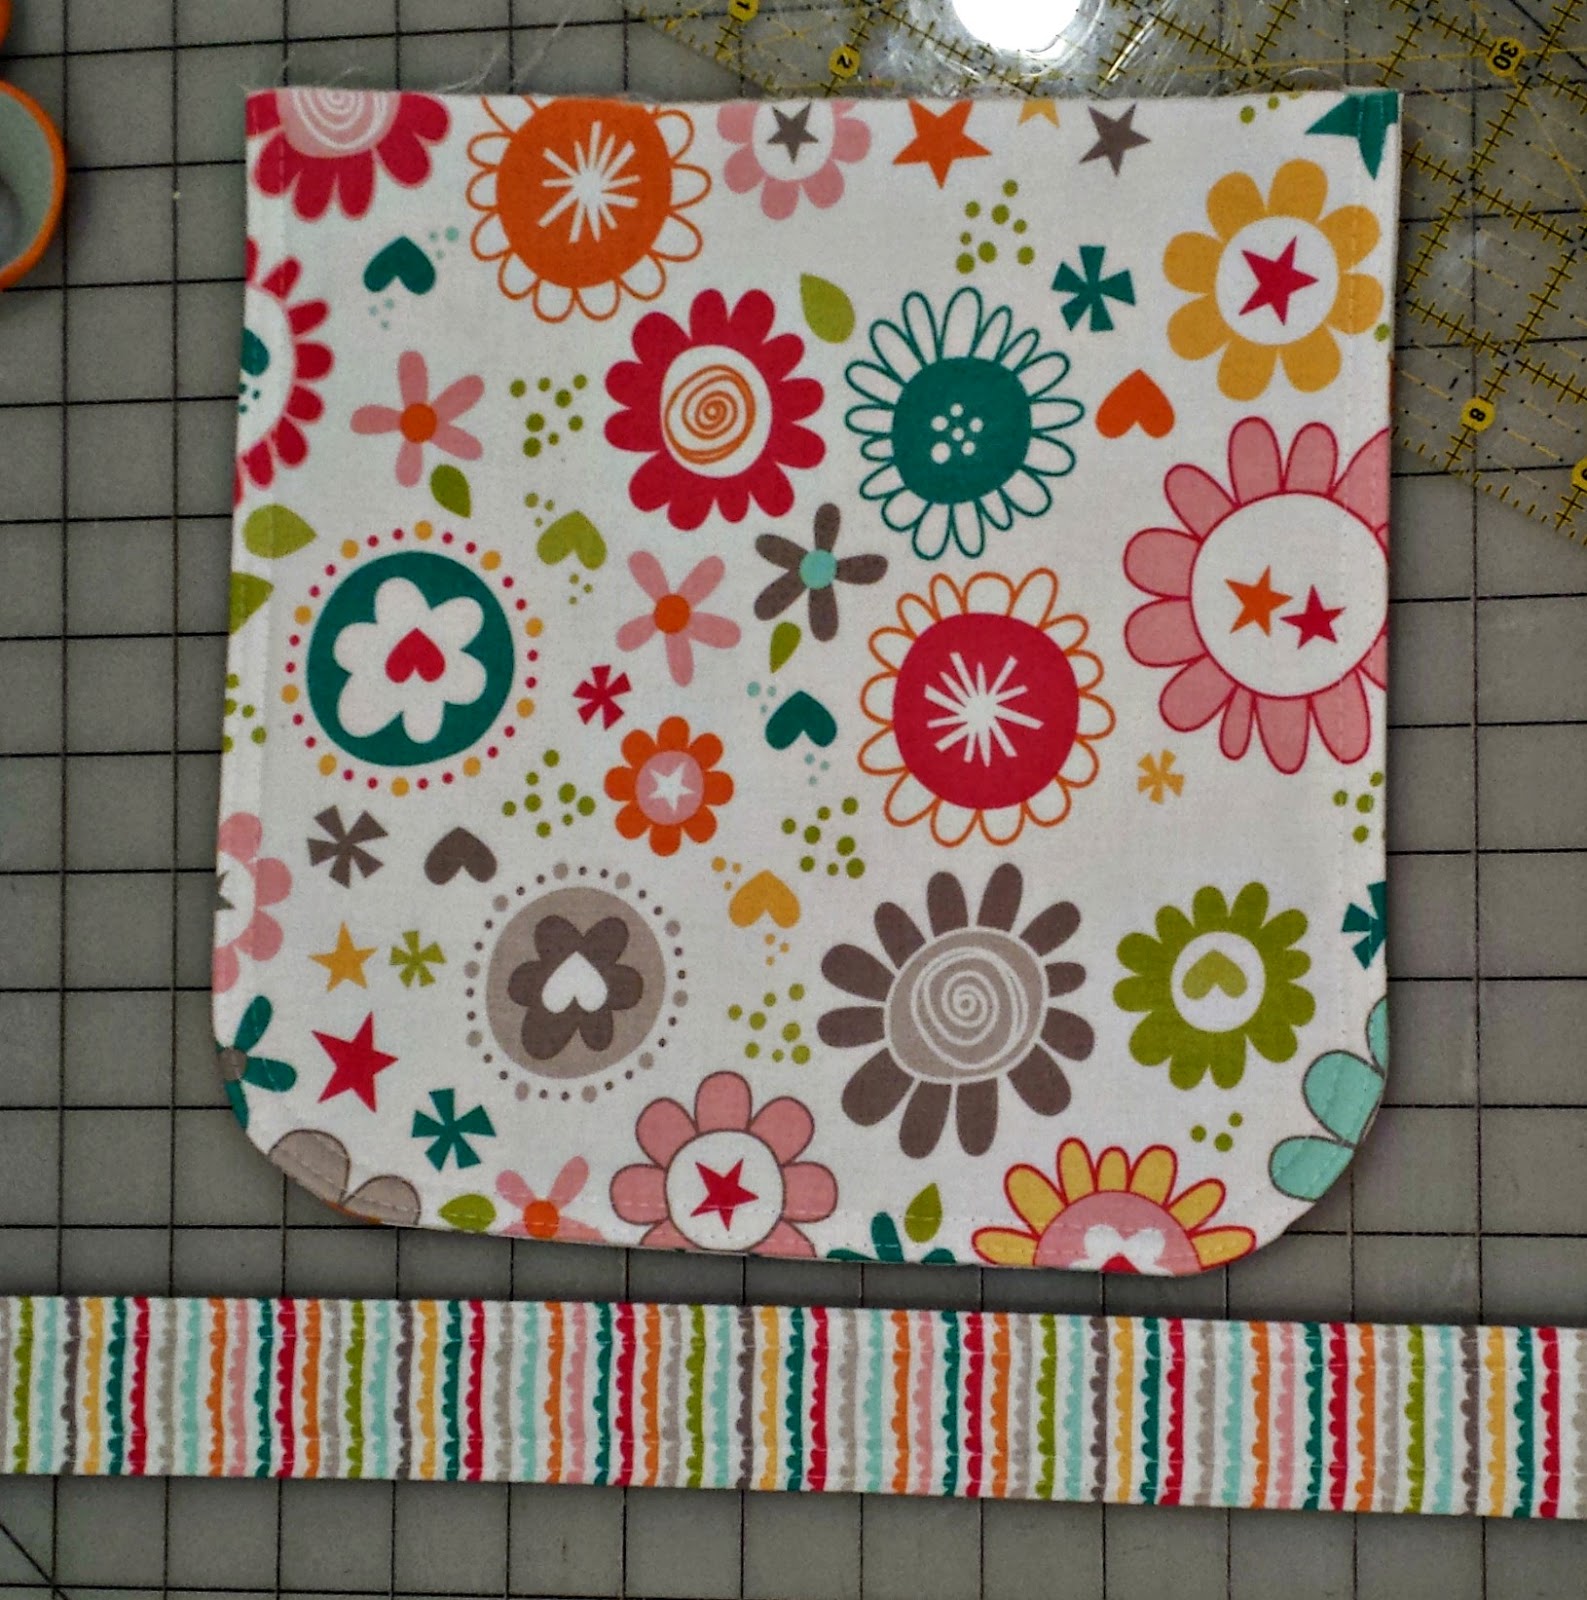
Top stitch around the three sewn sides of the flap and along both sides of the strap. Set these two pieces aside.
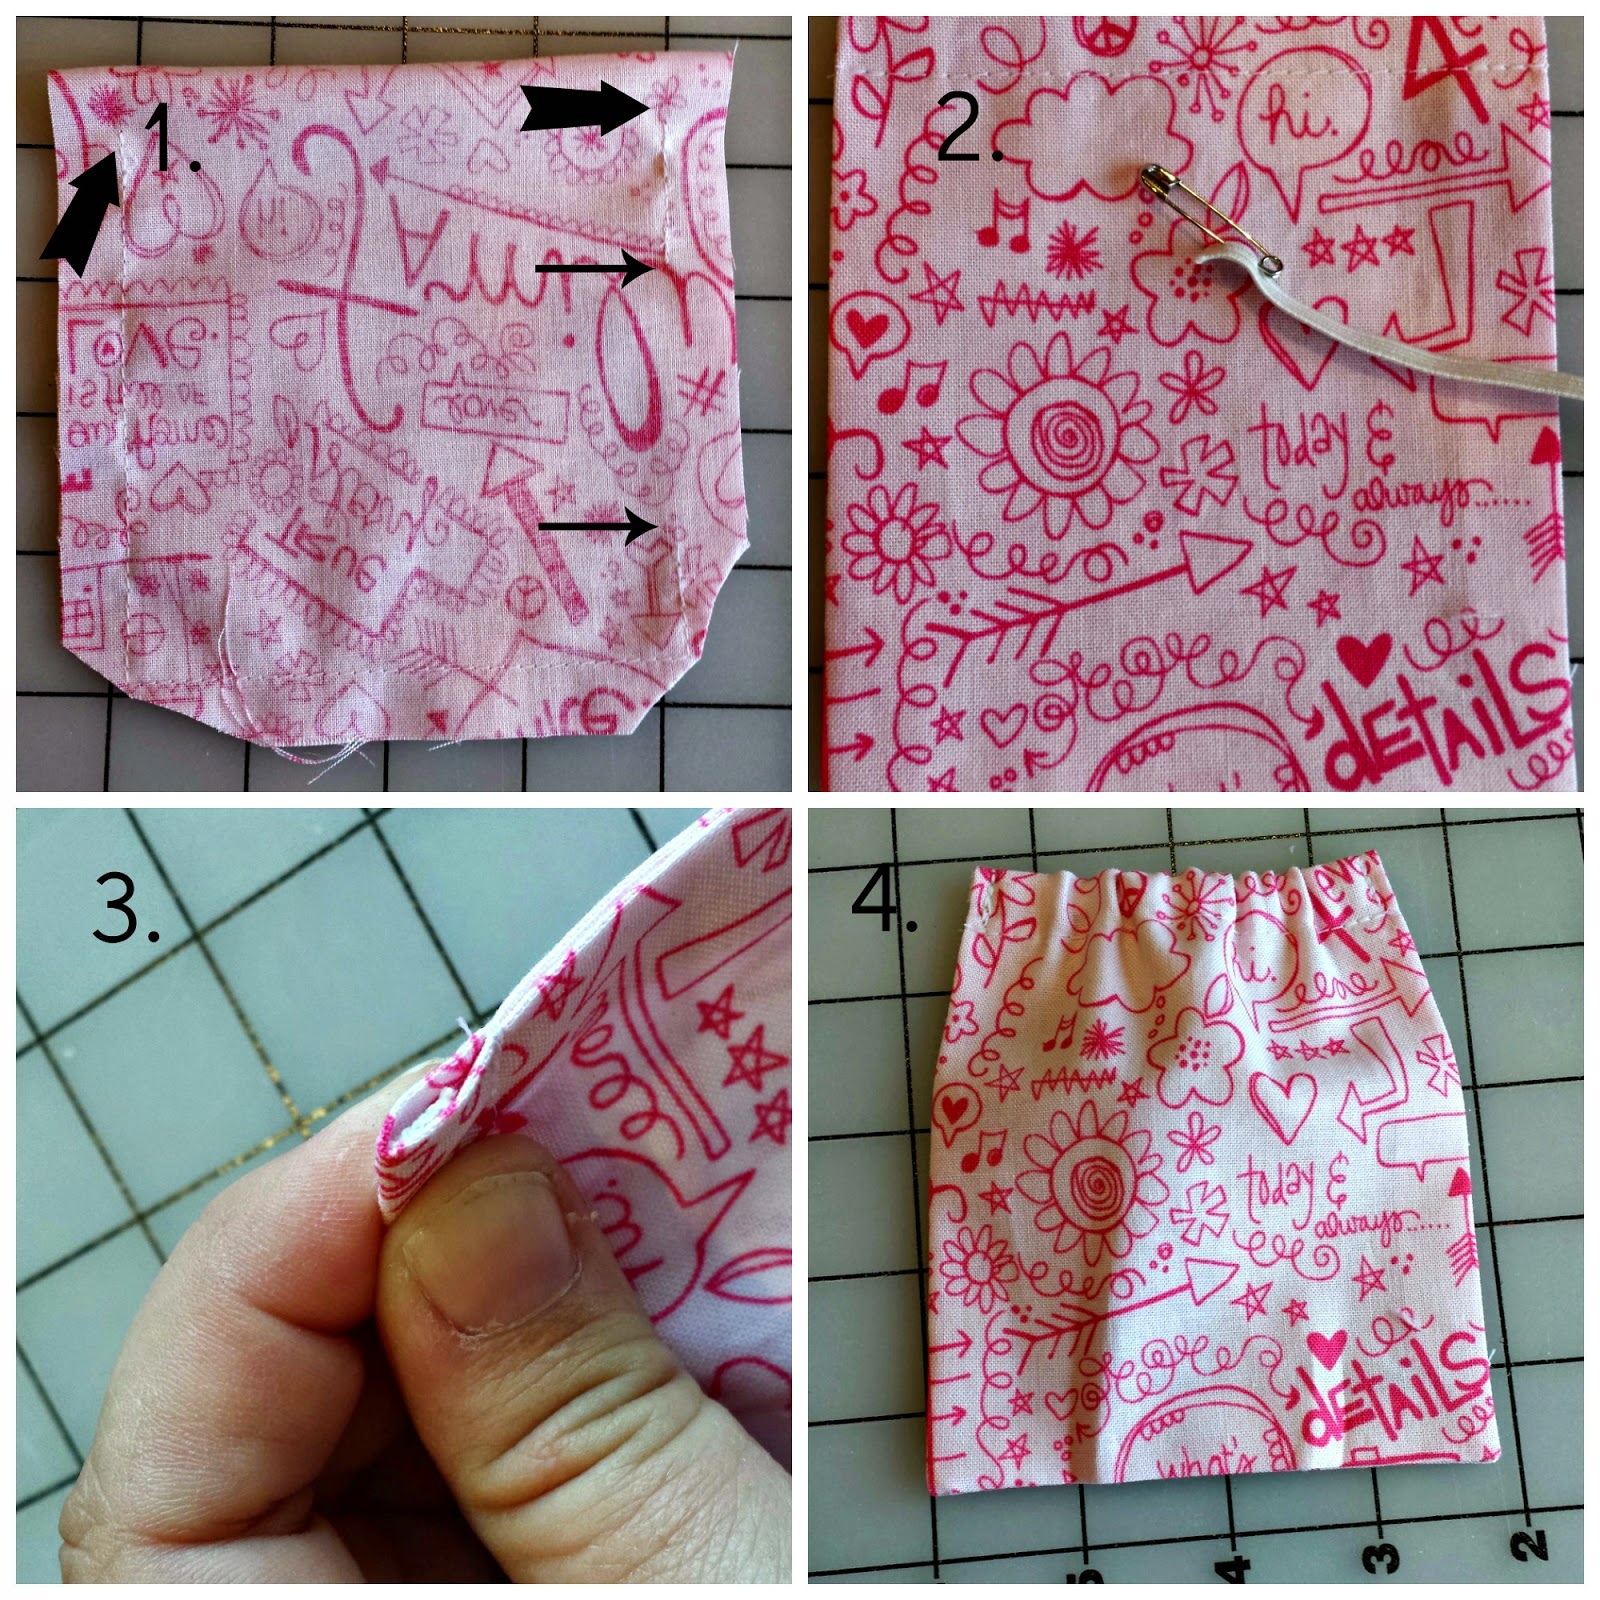
1. Press your pocket pieces in half wrong sides together- for the outside pocket, fold in half along the 10″ side to create a piece that is 5″ X 7″, for the interior pocket fold along the 13″ side to create a piece that is 14″ X 6 1/2″. Starting 1/2″ from the folded edge sew around all three raw sides, leaving and opening for turning- note the arrows in the picture- and stopping 1/2″ from the folded edge on the opposite side. Clip the two corners opposite the folded edge.
2. Turn right side out and press. Sew along the top of the pocket at 1/2″ to create a channel for the elastic. Use a safety pin to thread the elastic into the channel.
3. Pull the elastic until the free end is barely inside the channel (see picture) sew across this end of elastic so it doesn’t pull out of the pocket- back stitch to secure the elastic.
4. Pull the safety pin end of the elastic out of the channel, gathering the fabric at the top of the pocket. Remove the safety pin and carefully pull the elastic back into the channel until the end is barely inside the channel as in Step 3. Sew across the second side of the elastic to secure it into place. Do this for both the side pocket and the inside pocket.
DIY Diaper Bag Assembly:

1. Take your exterior bag piece and fold in half along the length to create a piece that is 9″ X 14″. Make a mark 1 1/2″ from the fold that is 2″ long, finish the rectangle by drawing a line that is 1 1/2″ long 2″ in from the side. Repeat on the second side of the folded edge. Cut out the rectangles. Sew up one side.
2. Turn the exterior bag piece right side out. Center the side pocket over the seam you just sewed, 2″ from the top of the bag. Pin the top of the pocket in place. Create pleats in the bottom of the pocket so the sides are perpendicular to the top of the pocket- pin in place. Sew around all three sides of the pocket. Turn the bag wrong side out again and sew up the second side.
3. We are going to create the boxed bottom of the DIY diaper bag. Line up the side seam with the bottom crease. This will create a straight line out of the rectangle we cut out earlier. Sew along this line. Repeat for both sides.
4. Turn bag right side out, pull on the side seams to create a flat piece on top. Center the flap along the back of the bag- it should be about 1 1/2″ from the side seam to the edge of the flap. Baste stitch in place. Center the ends of the strap on each side seam, pin in place making sure the strap is not twisted. Baste into place.
Create the Inside Pocket for your DIY Diaper Bag:
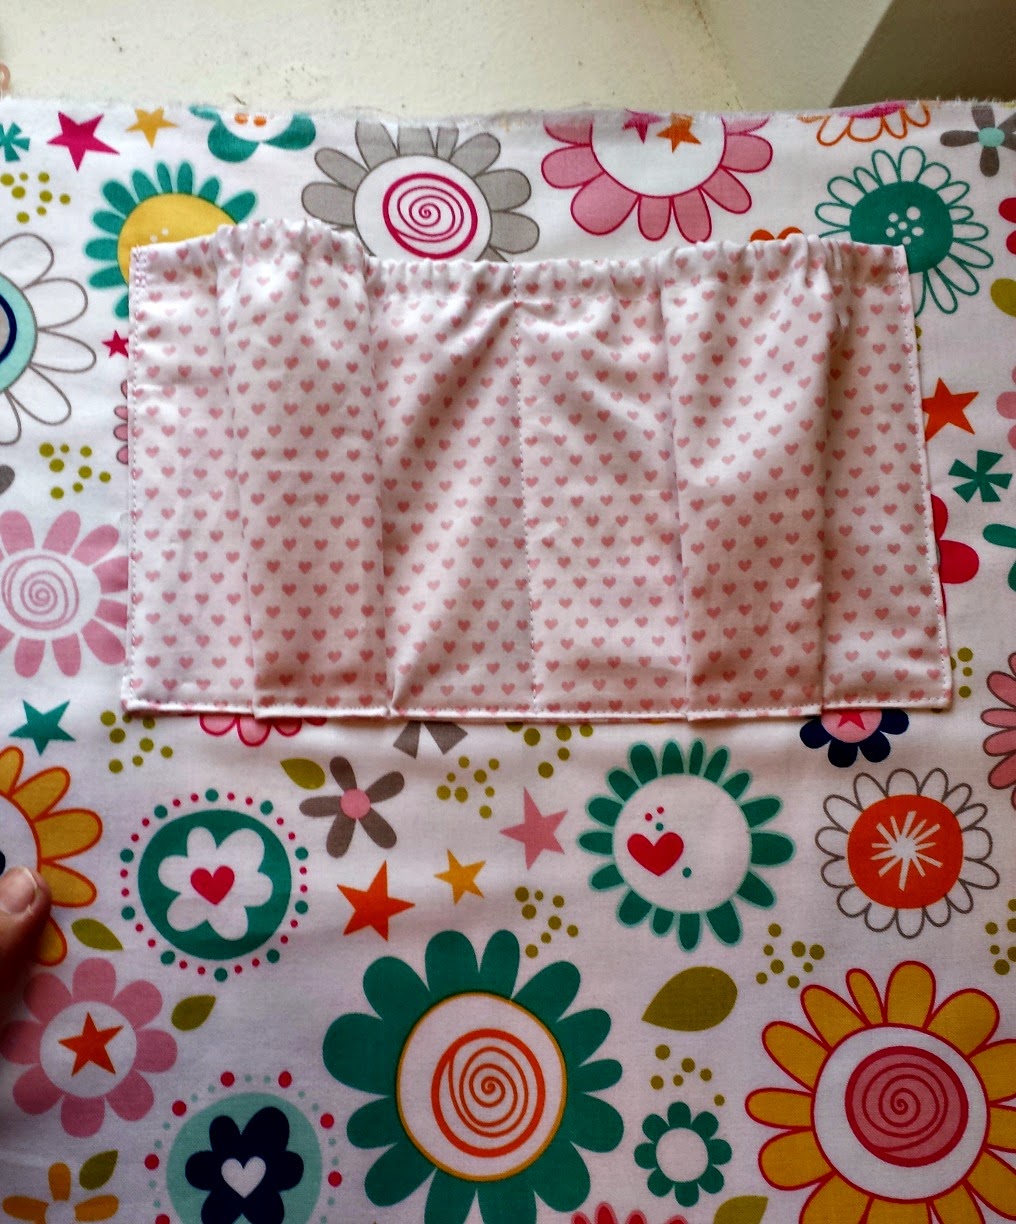
Line up the sides of the pocket 1 1/2″ down from the top of the lining piece and 2″ in from the sides- pin into place. Create pleats in the bottom of the pockets to gather the extra material, making sure the sides are perpendicular to the top of the pocket- use the picture as a guide. The pleats will be approx. 1/4″ deep. Sew around the three sides of the pocket. Mark the center of the pocket- 5″ in from the side- sew along this line to create two pockets.
Repeat steps 1. and 3. from the exterior bag assembly to cut out the rectangle and box the bottom of the bag.
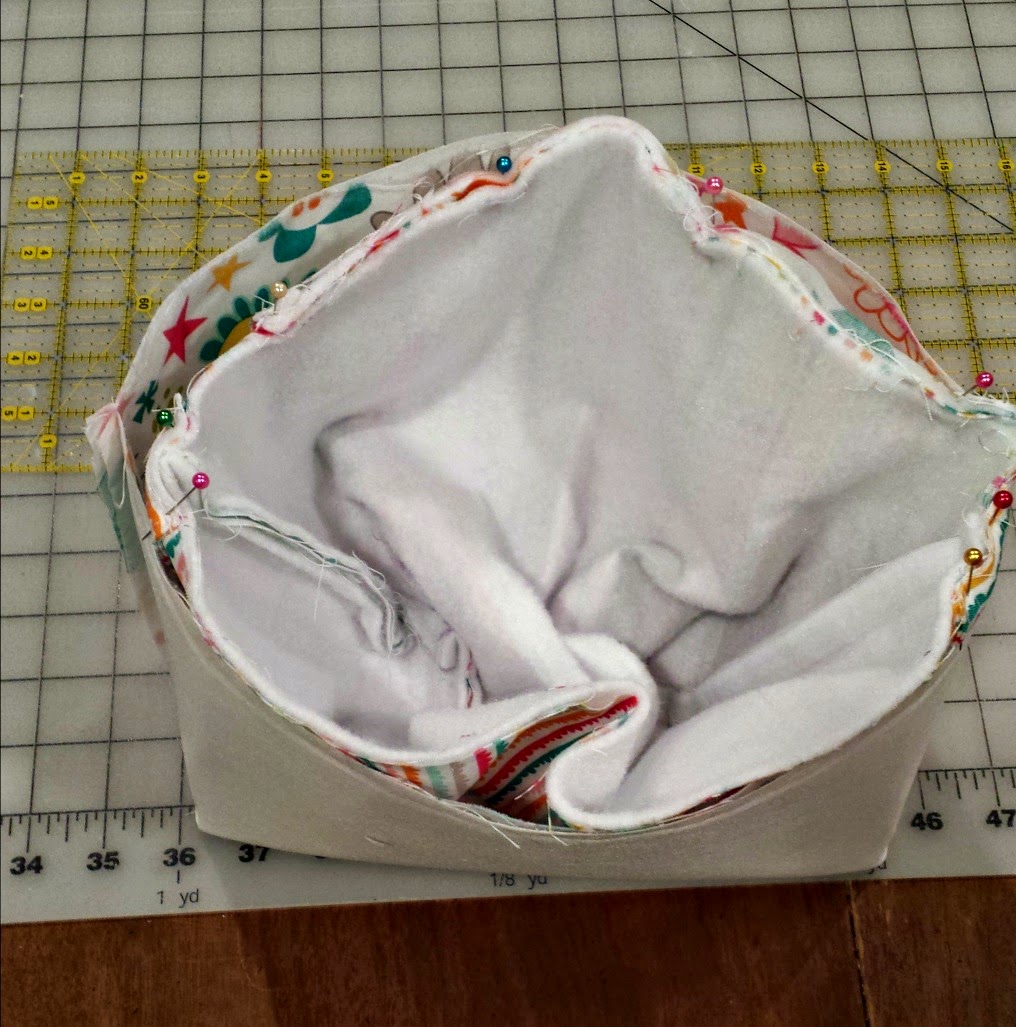
Place the exterior of the bag inside the interior of the bag. Make sure the flap of the bag is on the same side as the inside pocket. You can see from the picture that you will have to fold and scrunch the fabric to get the tops of the bag pieces to line up. (you will also see from this picture that I did not baste the flap or straps into place- what can I say, I’m a rebel) Start at the side seams and line them up and begin to pin the tops of the bag together- keeping everything lined up. Sew around the top of the bag- leaving an opening for turning- it’s easier if the opening is NOT on the side with the flap. Turn the bag right side out through the opening. Push all of the corners out well. Push the inside of the bag into the exterior of the bag. Press the top seam, folding over the opening left for turning. Top stitch the top seam of the bag, making sure to close the opening. Press your DIY diaper bag to remove any creases from turning the bag.
Step back and watch your little one enjoy their new DIY diaper bag!

I hope you, and your little ones, enjoy your new DIY diaper bag!


Unknown
August 4, 2018 at 4:46 pmHi Amy
Super cute bag! I'm wanting to make this for my littles but I was wondering if you could tell me what the finished dimensions are.