This post was first published 2/20/2019 and updated 4/6/2023
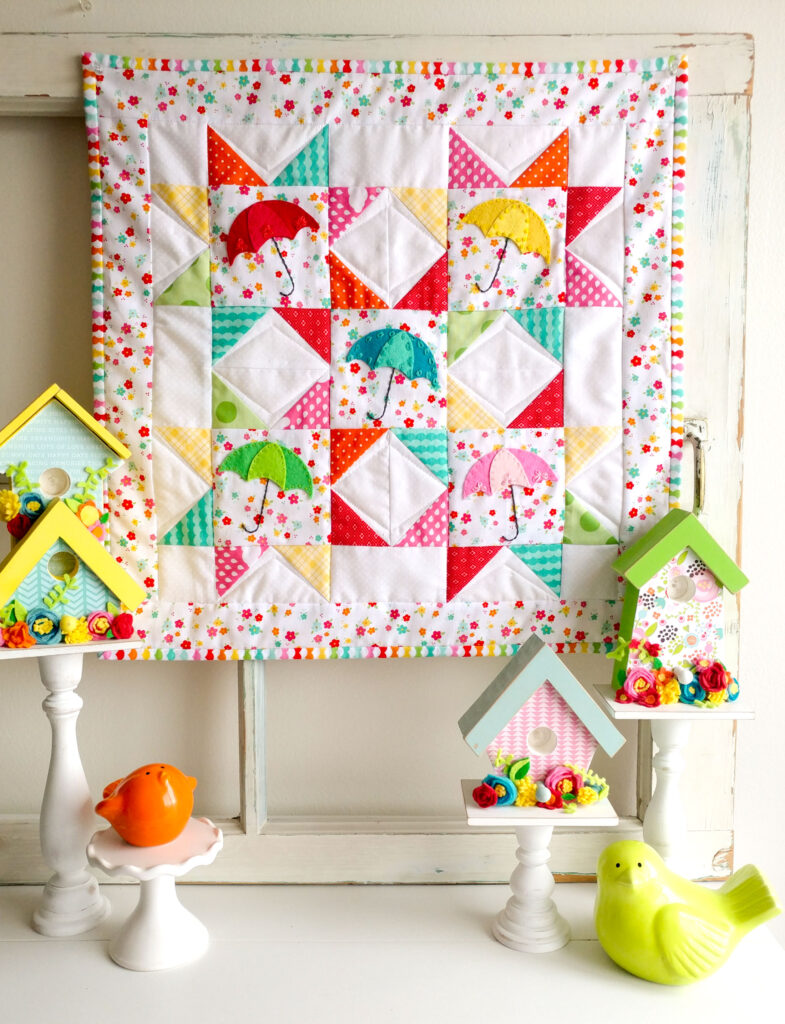
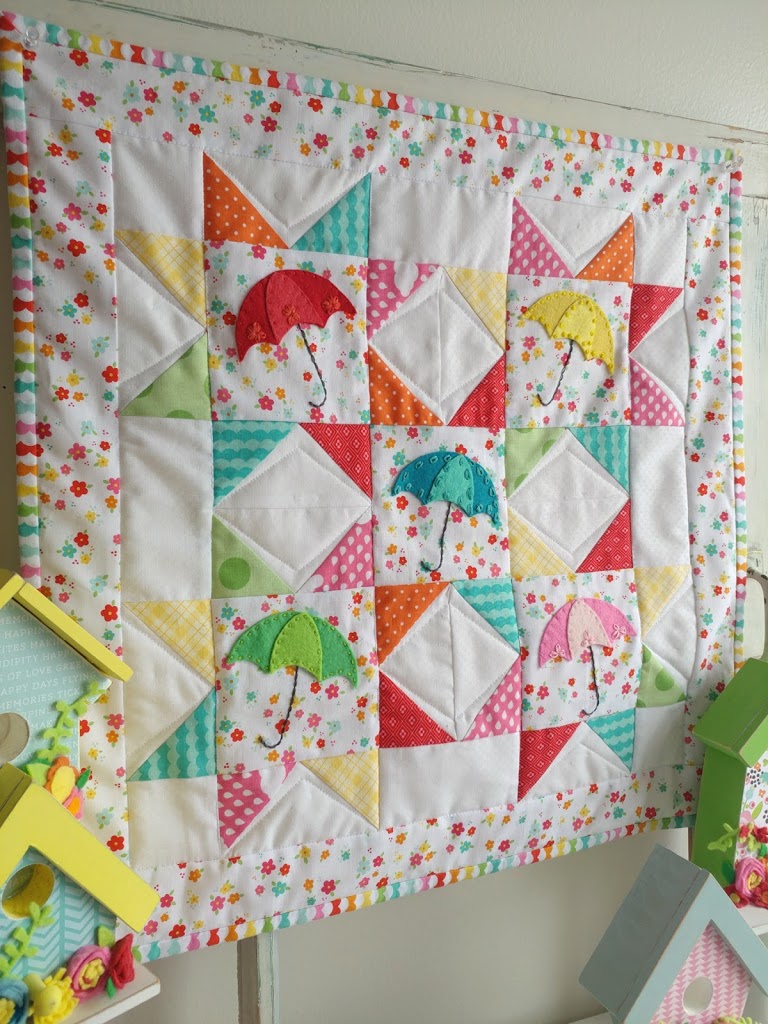
Is anyone else as ready for spring as I am? It seems like by the end of February it’s all I can do to stay inside! Unfortunately I live in Utah and we still have a few more weeks of winter weather, but that won’t keep me from springtime dreaming! This Springtime Showers Mini Quilt is a fun quick sew and will brighten your days until spring arrives outside! I used Bloom Where You’re Planted fabric by Lori Holt for Riley Blake designs,but this mini would be darling in any bright fabric. This tutorial first appeared on The Polkadot Chair blog last year and I’m re-sharing it here. If you are interested in a printable version of this pattern, I have one available in my Etsy shop here: Springtime Showers Mini Quilt Pattern PDF. The PDF includes both the umbrella pattern as well as the strawberry pattern I used in this version here.
I just love the look of scrappy quilts and decided to make this spring mini quilt out of scrappy sawtooth stars. I pulled from my stash and matched the colors in the floral print I wanted to use as the background for my umbrellas.
Springtime Showers Mini Quilt Tutorial
Fabric Requirements:
Background fabric 1/4 yard. (recommend a non-directional fabric)
Applique Background and Border fabric: 1/4 yard (may also use two different fabrics for these)
1/4 yard for binding
16- 3″ colored squares from scraps
2/3 yard backing fabric
Additional Supplies
various felt colors- I highly recommend a quality wool blend
embroidery floss to coordinate with felt
sewing machine and tools
quilt batting
Umbrella pattern
freezer paper
Cutting instructions for Springtime Showers Mini Quilt:
from background fabric:
- 5 1/4″ squares- Cut 4
- 2 1/2″ squares- Cut 4
- 2 1/2″ X 4 1/2″ rectangles- Cut 4
Applique and Border Fabric:
- Begin by cutting one 2 1/2″ X width of fabric strip and then sub cut that strip into 2- 20 1/2″ strips.
- Next, cut a 16 1/2″ (w) piece from the remaining fabric piece then cut 2- 2 1/2″ X 16 1/2″ strips from that piece.
- Finally, from the remaining length of fabric cut a 4 1/2″ (h) strip and subcut the 5- 4 1/2″ applique background squares from that.
Scrappy star point fabrics:
- 16- 3″ squares
from backing fabric
- 21″ square
Quilt batting
- 21″ square
Assemble flying geese:
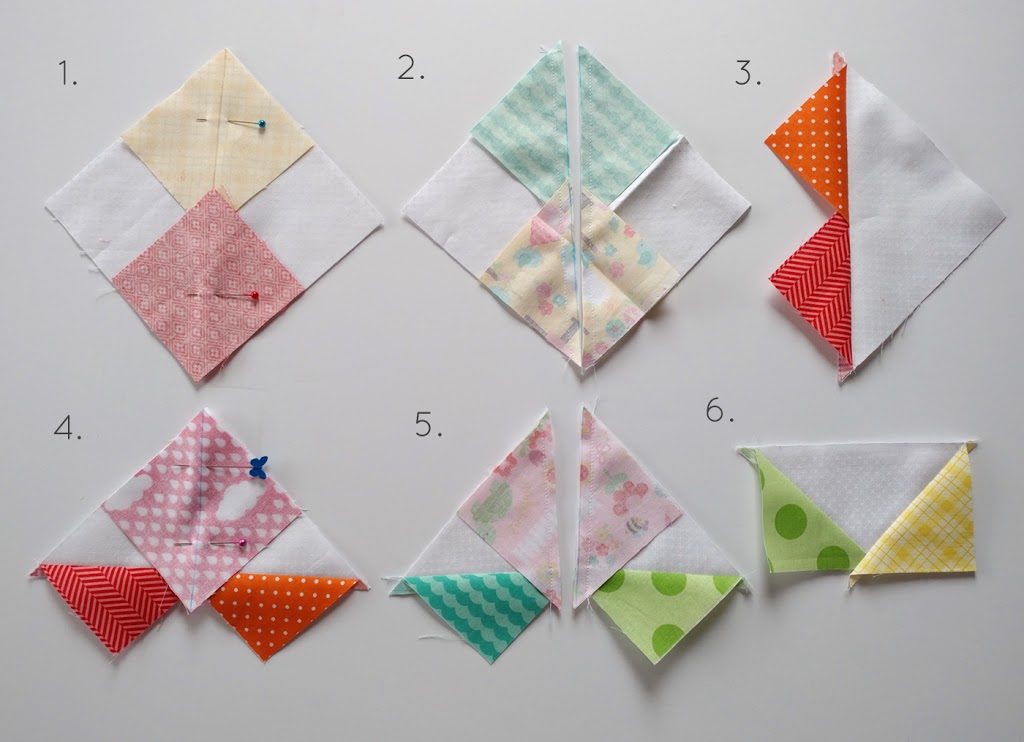
I used this tutorial by Diary of a Quilter to make flying geese sawtooth stars. It’s a great reference if you want to design your own project! I’ll show you how I made our particular stars below:
1. Begin by marking a diagonal line on the backs of all your 3″ colored squares. Divide them into 4 groups of 4. Take one 5 1/4″ white on white square and place it right side up in front of you. Take 2 squares from one of your groups and place them right side down on the white square so they line up diagonally from each other and the drawn lines line up. The corners will overlap.
2. Pin the colored squares in place and sew on either side of your marked line with a scant 1/4″ seam. Cut apart on the drawn line.
3. Press the colored triangles away from the white (seam allowance will go toward the triangles)
4. Pin the other two colored squares from the group to the two halves. (see picture for positioning) They are still right sides together.
5. Sew on either side of the marked line, again using a scant 1/4″ seam allowance. Cut along the drawn line.
6. Press the colored triangle away from the white center. Square up to 2 1/2″ X 4 1/2″, making sure to leave 1/4″ between the point where the two colored triangles cross and the edge. Repeat for all groups, you should end with 16 flying geese units in all.
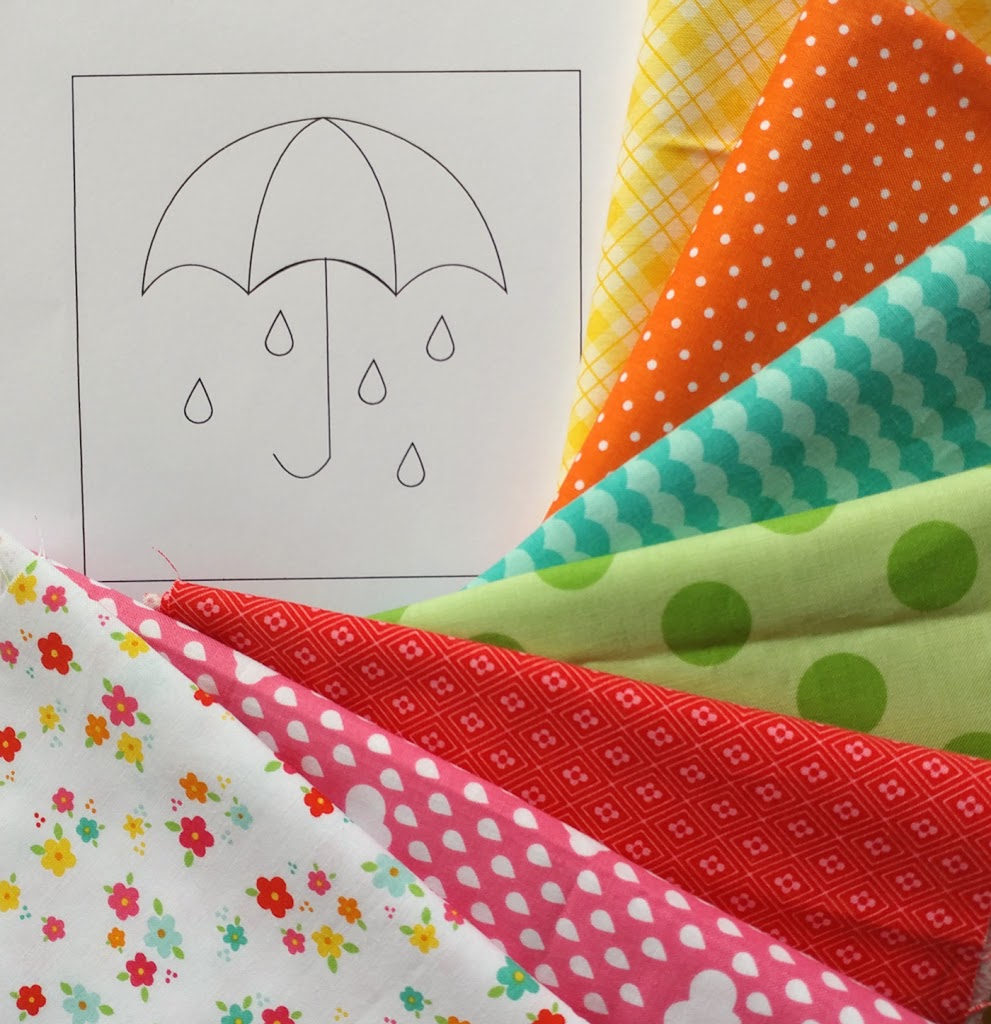
Umbrella applique:
*NOTE: you can leave off the umbrella applique if you like, the mini would be darling without it as well.
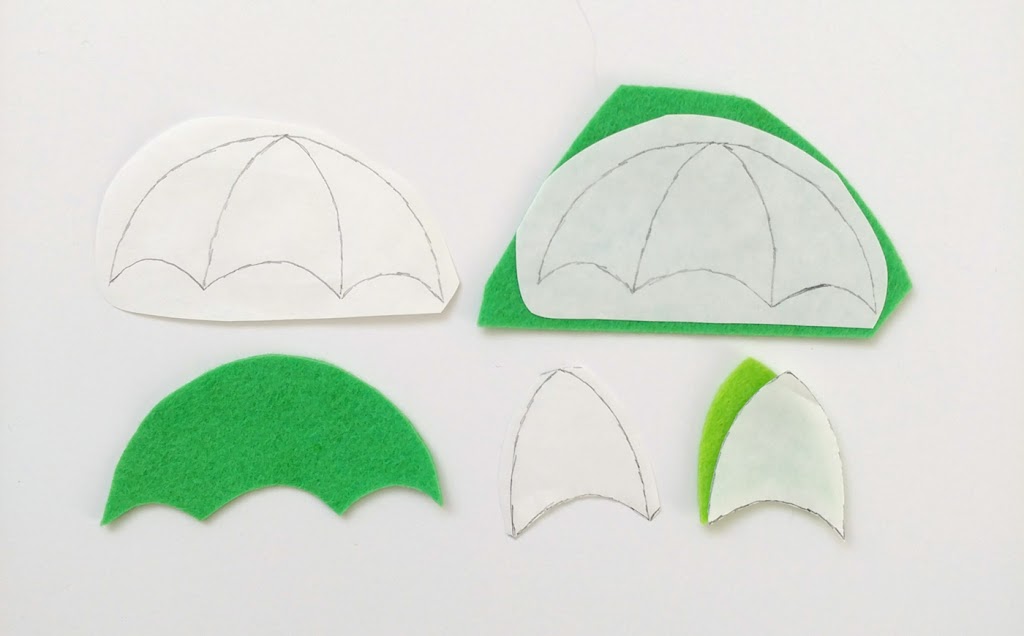
Prepare Applique:
I have found the best way for cutting applique pieces out of felt is to use freezer paper.
- First, trace five umbrella tops onto the paper side of a small piece of freezer paper.
- Second, cut apart all the tops so they are separate. Leave a small margin around each piece.
- Use an iron on medium heat and press the umbrella tops onto the background color of felt you are going to use.
- Cut out along the outside of the umbrella top.
- Next, peel the freezer paper off the felt piece.
- Trim paper away from the center piece of the umbrella top, leaving a small margin around the lines.
- Finally, press the paper onto the accent color of felt and cut it out.
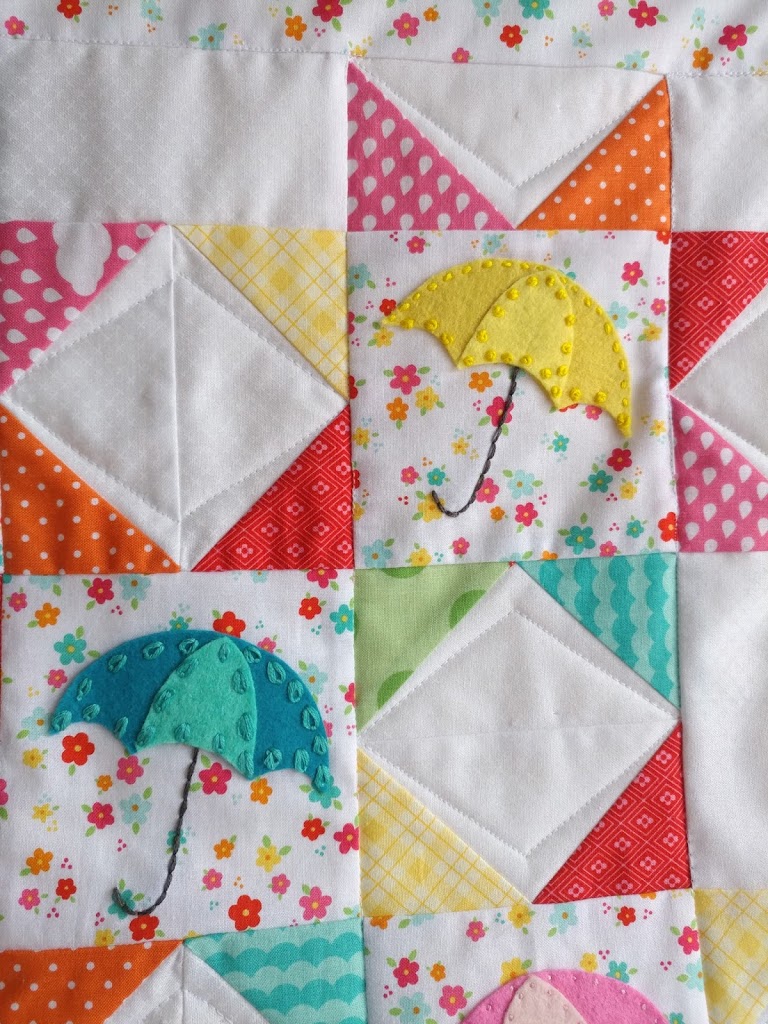
Stitching Umbrella applique onto Springtime Showers mini quilt:
- Stitch the umbrellas onto the 4 1/2″ applique background squares using a sewing machine or embroidery floss-
- I used 3 strands of floss. Vary the position of the umbrellas on each square, just make sure to keep in mind seam allowances and room for the handle when you place the umbrella tops.
- Use the template to trace the umbrella handles onto the applique background fabric.
- I use a light box, but you can also put it up against a window when it’s light outside to see the pattern.
- Stitch the handles using a back stitch and embroidery floss.
Assembling the Mini Quilt Top
Lay out your rows according to the picture:
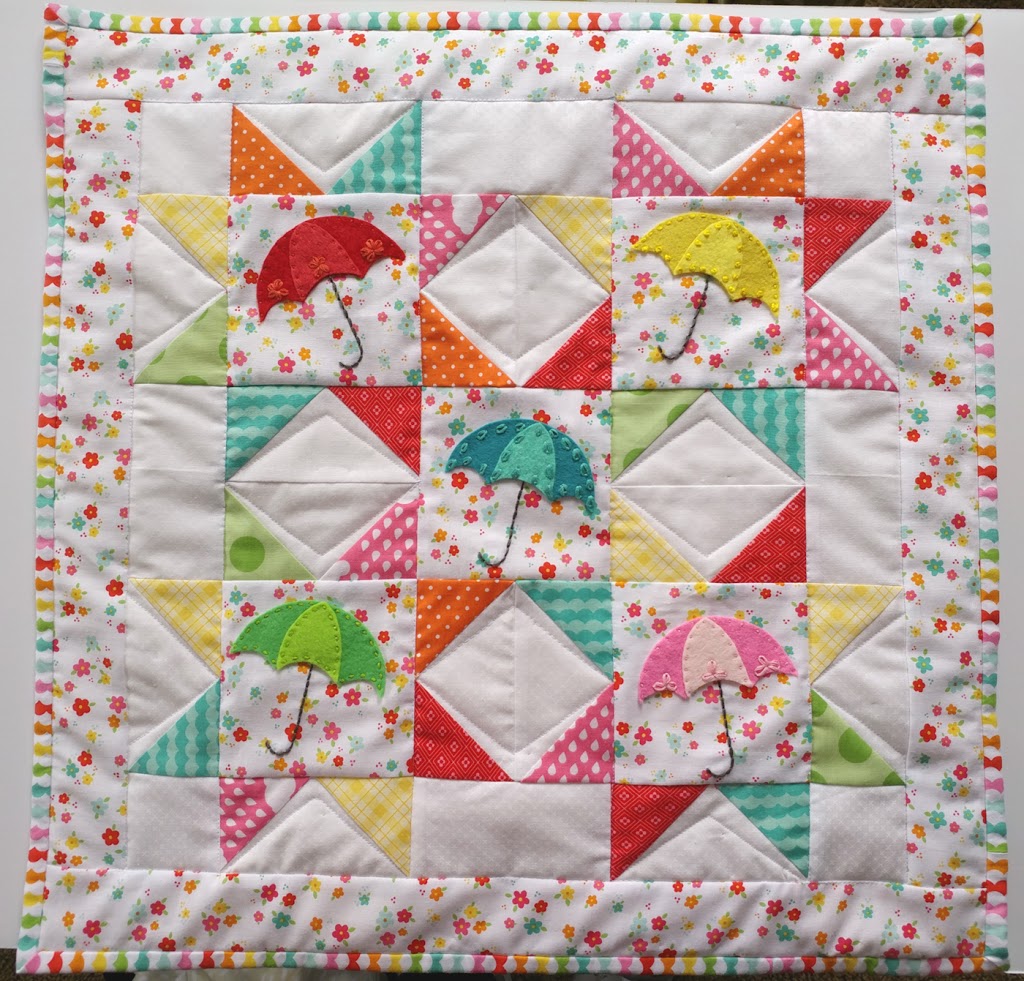
- Top Row: 2 1/2″ square, flying geese block, 2 1/2″X 4 1/2″ rectangle, flying geese block, 2 1/2″ square
- Row 2: flying geese block, 4 1/2″ square (umbrella), flying geese block, flying geese block, umbrella, flying geese block
- Row 3: 2 1/2″ X 4 1/2″ rectangle, flying geese block, flying geese block, umbrella, flying geese block, flying geese block, 2 1/2″ X 4 1/2″ rectangle
- Fourth Row: flying geese block, umbrella, flying geese block, flying geese block, umbrella, flying geese block
- Last Row: 2 1/2″ square, flying geese block, 2 1/2″ X 4″ rectangle, flying geese block 2 1/2″ square
Sew Mini Quilt top together
- Begin by sewing the sets of flying geese blocks in row 3 together. Press the seam allowance open.
- Next, assemble rows together, press seam allowances away from the flying geese blocks. Where the flying geese blocks are sewn together in rows 2 and 4, press the seam allowances open.
- Sew rows to each other, nesting seams together.
- Then, sew side borders on.
- Finally, sew on top and bottom borders.
To finish your mini quilt create your quilt sandwich with quilt top, batting and backing. Next, quilt and square up to 20″. Finally, bind and you are done!
*If you would like to turn the mini quilt into a pillow, I recommend using this Hidden Zipper Pillow back tutorial.
After your Springtime Showers mini quilt is quilted and squared up to 20″ place face down and put pillow back right side up on the back of the quilt. Baste in place. Finally, bind the quilt as desired and now you have the option of a quilt or pillow!
If you’re looking for more spring inspiration:
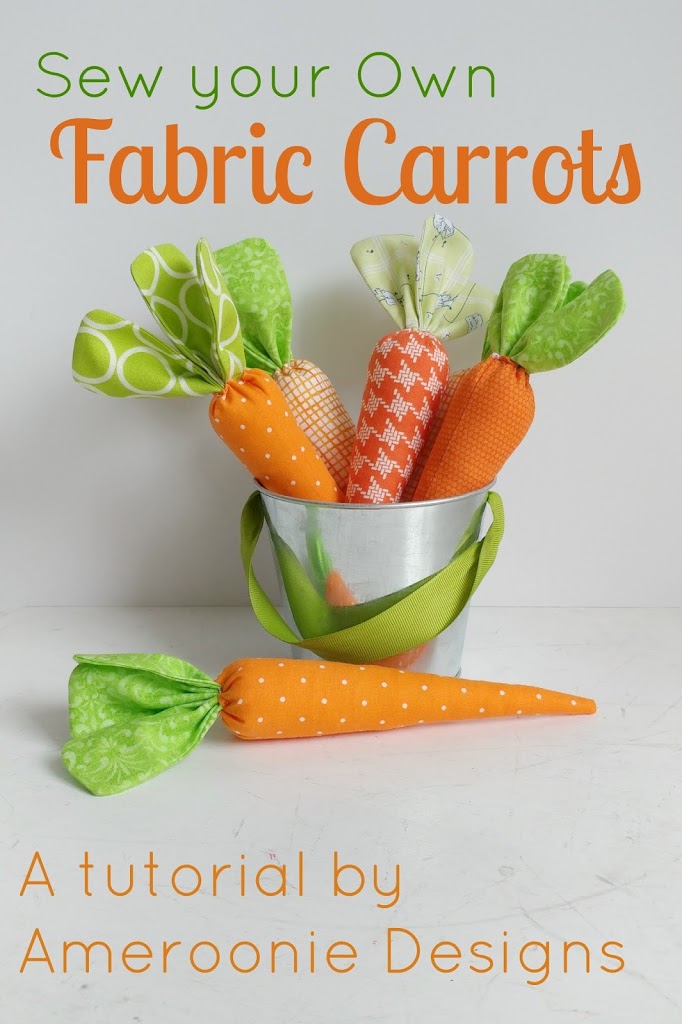
This Fabric Carrot tutorial can be found here

And this Tiered Pillowcase dress can be found here