It probably goes without saying, but I LOVE fabric.
I love using fabric to add color to my home, and if it does double duty as a functional item? Bonus!
I love the clean, crisp look of roman shades- plus they are simple to make and can be customized to fit your window and your style. They are wonderful.
Today I’m going to show you how to make your own. I will add a disclaimer that this will require math. Don’t let that scare you- you can totally do this.
The post might feel a bit wordy, but I want to make sure you have the tools to figure out your own window- as the measurements will be different than mine. Before we begin, there are a couple of other wonderful tutorials out there that I have learned from here and here. If something is confusing, or you want to see a different way to make it- check them out.
Materials:
- Fabric
- Blackout lining- usually found near the utility fabrics in your fabric store. (you don’t have to use this, but it won’t block as much light if you just use muslin or other fabric- and the sun rot will happen faster with regular fabric)
- brass rings (again, this helps with the sun rot, but you can use plastic as well)
- flat metal rod to weight the bottom of the shade (you can find these at your local home improvement store- you could also use a dowel if you need to)
- Wood to brace the shade to the window casing or wall (I like to use 1″X2″)
- nylon string to pull the shade (along with the brass rings, this can be found in the curtain making section of Joann or Hobby Lobby)
- screw eye hooks (a round loop with a post with screw threads on it- you will run your string through this)
- staples and a staple gun (if you have them, if not, you can use flat thumb tacks.
- Drill and screws for hanging.
The first thing you need to do is measure your window. You need the height (top to bottom) and width (side to side). My window was 47″ tall by 46 1/4″ wide.
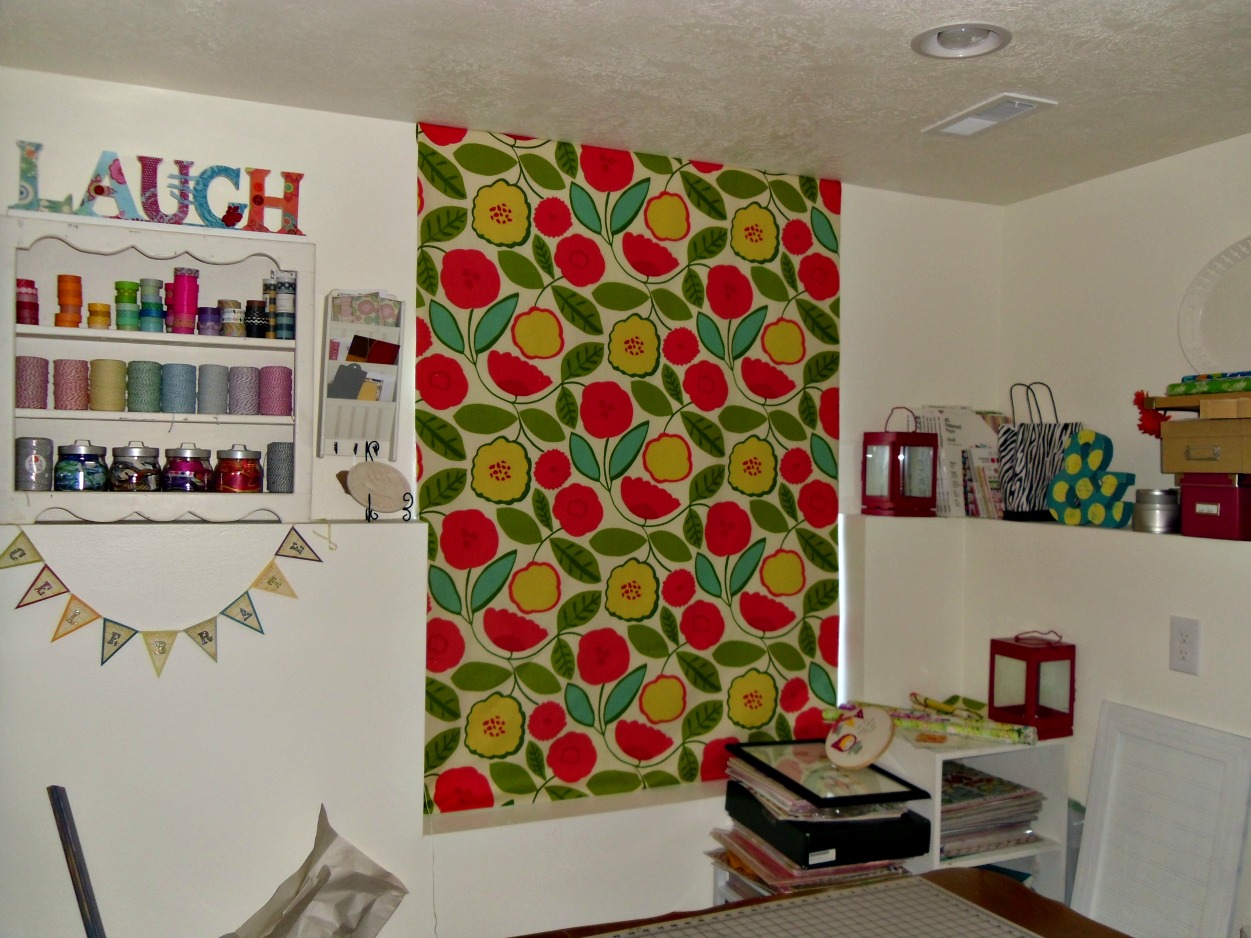
However, since this window is in the basement, I didn’t want to install the shade in the window casing like you usually do- I didn’t want to lose any of the light in my room. So, I decided I would mount my shade at the ceiling, so when it is open, all the fabric will hang on the wall and not cover the window. The added height made my new measurement 65″ tall by 46 1/4″ wide.
Now for the math. We need to add seam allowance on the sides, so when we sew the two pieces of fabric together, it will still fit the window. I am using a 1/2″ seam allowance, so I need to add 1″ to my width.

Probably the hardest part of the whole process (aside from that math stuff) is accurately measuring the pieces of fabric. The better you do, the more crisp the shade will look in the window. Press your fabric first and make sure you are working on the largest flat surface you can. The less you fold the fabric the straighter the cuts will be.
Cut out your fabric and black out lining to the dimensions you just calculated.
Pin the fabric and lining right sides together. Sew around 3 sides, leaving the top open.
Now, I’m going to show you a neat trick I learned from one of my readers a long time ago. It creates neat, crisp corners without clipping fabric. Are you excited? 🙂

First, fold the bottom seam along the sewn line. Next, fold over the side, also along the sewn line. Gather up the fabric so you are pinching both sides of the corner together (inside and outside), turn the fabric to the right side, pushing out the corner.
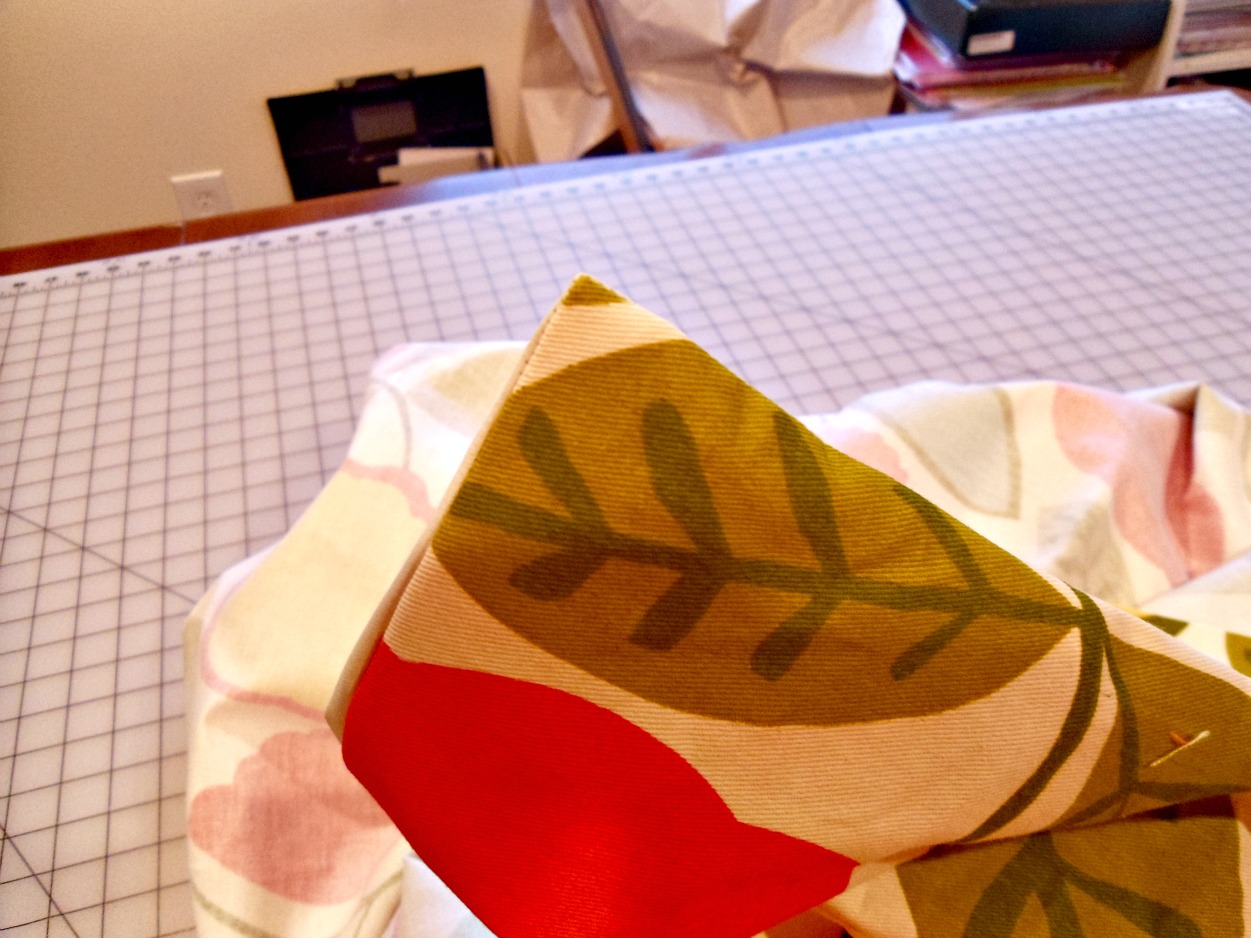
Presto! A nice crisp corner. You may need to use a tool to push it all the way out. Repeat for the other side. (I use this method on my pillows as well)
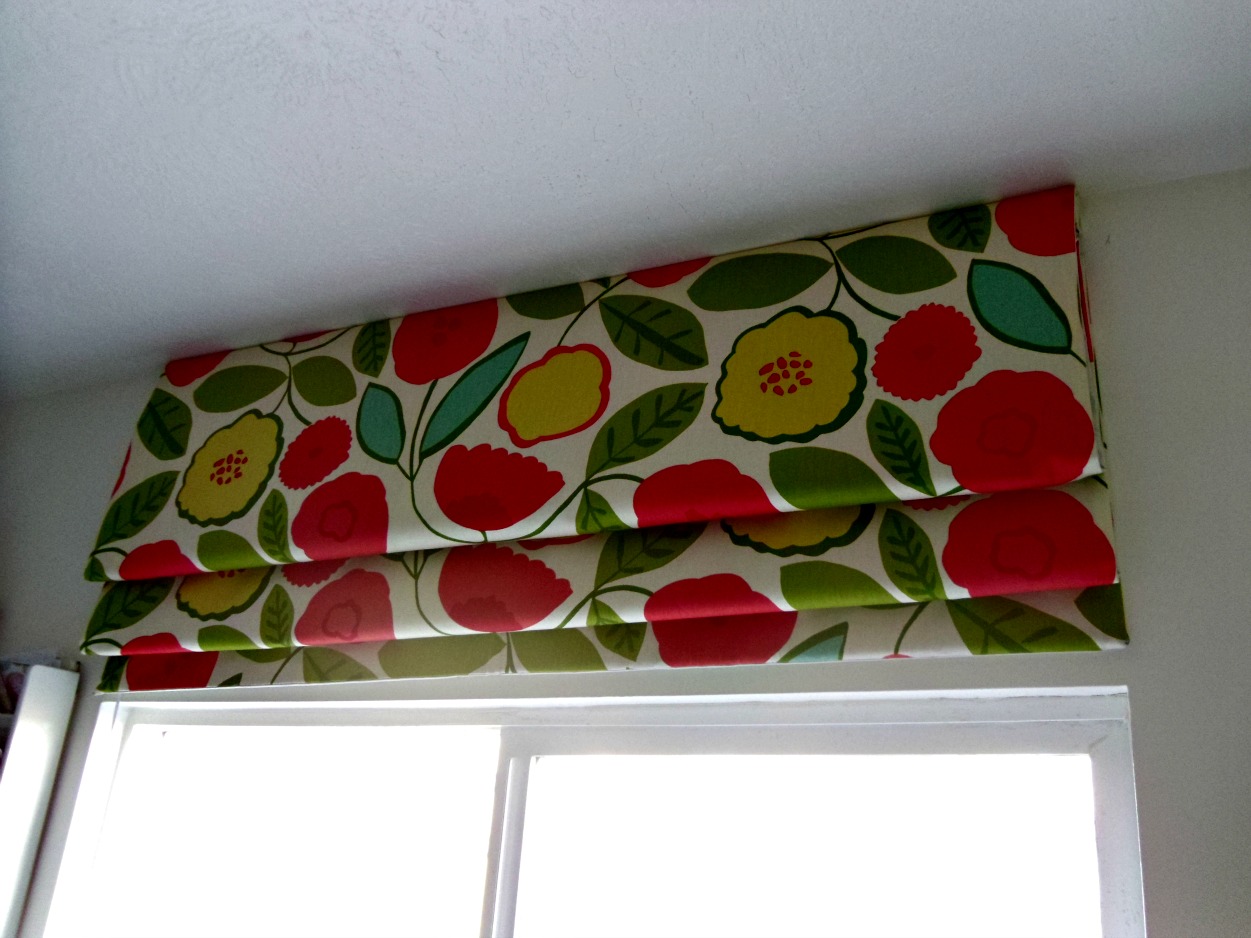
Now that our shade is sewn, we are ready to add the mechanics to make this work. Decide how you want your shade to hang when it is open. This is where you will have to fiddle with the measurements until you achieve the look you want. I like the look of a graduated shade where the pleats gradually get smaller, but if you want a more uniform shade, you can keep the pleats all the same size- just be aware that if your shade is long, it might bunch up with all the folds in the same place.
I wanted my pleats to cover the wall above the window, so my bottom pleat was 15″. I wanted to have the next pleat be just a bit shorter than the last one so it would have a graduated look. I started with a 13″ pleat for the second (just an educated guess). The pleat is made when two sets of rings are pulled together, to determine how much length of your shade a pleat will need you multiply the desired length of the pleat by 2. (13″ X 2= 26″). The height of my finished curtain is going to be 65″, if I subtract the two pleats I am left with 24 inches (65-15-26=24)- this will be folded in half to make the final pleat of 12″. So my three pleats, when the curtain is open would measure 15″, 13″ and 12″. In my case it works out pretty well. The difference between the first and second pleat is 2″, and the second pleat is only 1″ longer than the third which will work just fine- but if the gaps between the pleats weren’t so close, you may need to adjust the size of the pleats to even them out. If you have any questions at all- please e-mail me or ask in the comments I will do my best to answer them!
Now that you have the distance for the pleats, decide how many rows of rings you will need. The more rings you have the less it will droop (or you can use the dowel method from this tutorial). I am using 5 rows, I try to keep the space between rows less than 15″, but sometimes it’s just a number I pick. The first and last row will be 2″ from the side of the shade, then divide the remaining space evenly into the remaining sections you have.
Here is my math: My shade is 46 1/4″ wide. Two of my rows will be 2″ from the sides, taking 4″ off the span to be divided- 46″-4″= 42″. Since I am doing 5 rows total, I have 3 rows left to space- leaving 4 sections between them. 42″ / 4″= 10 1/2″. My rings will be spaced from left to right: 2″, 12 1/2″, 23″, 33 1/2″ and 44″.
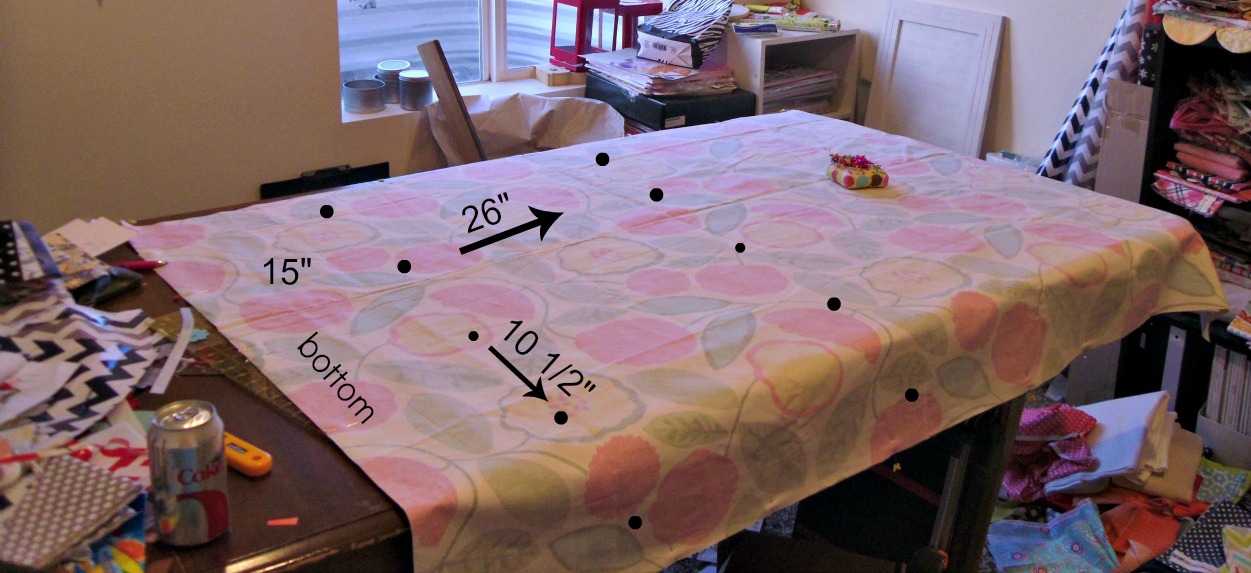
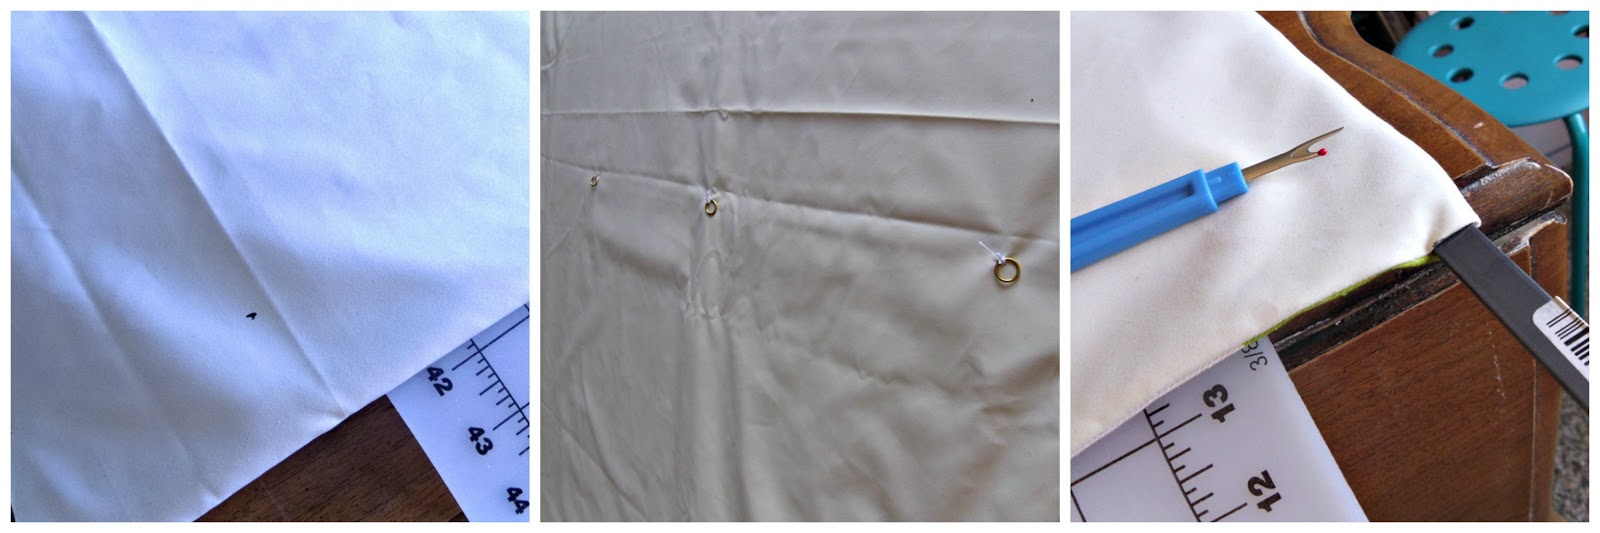
Using your measurements for the spacing of the pleats and the rings, mark your fabric where the rings will go. Sew the rings on at each of the marked spaces, sewing through the lining and curtain fabrics. Using a seam ripper, make a small hole in one bottom, side corner big enough to allow the metal bar to slide in.

If your shade is as big as mine you may need to recruit help to dry fit the shade to your window. You want to make sure the bottom rests on the sill, wrap the extra fabric around your wood brace and staple it into place. (or if you don’t have staples, you can use the thumb tacks like I did) Line up your eye screws with the rings and screw them into the brace. Tie your nylon strings to each of the bottom rings and singe to keep the knot from fraying. Run your strings up through the rings and the eye screws to one side (it doesn’t matter which side, just determine where you want the strings to come down).

Now we are going to hang the shade. This part gets a bit tricky, again, it might be nice to have some extra hands- one set to drill in the brace, the other to keep the fabric out of the way. You will want to find and mark studs if you are putting this on a wall. If you are hanging it in the window casing, there SHOULD be a header to screw into, but you will want to make sure your shade is anchored well as the tension for pulling it up will put a lot of strain on the brace.
Fit the shade where you want it to go, then lift up the fabric to get to the brace underneath. Using the appropriate screws and a drill, mount the brace to the wall or window. All that is left is to mount a cleat or hook to wrap the string around to hold the shade open.
Thank you for hanging in there with me. I could have simplified this a lot, but it wouldn’t have given you all the details you’ll need to do it yourself. I know the math might seem scary, but really, it’s not too bad. And, I’m here to answer any questions you might have.
Linked up to Get Your Craft on at Today’s Creative Blog, and linked up to Creative showcase at Housewife Eclectic, Motivate me Monday on Keeping it Simple, Market Yourself Monday at Sumo’s Sweet Stuff


Gwen @ Gwenny Penny
April 30, 2013 at 2:50 pmGreat tutorial, Amy. I love the fabric that you chose. So bright and cheery! It looks great in that space. And genius to hang the shade above the window so it doesn't block any of the light when it's open.
Michele Pacey
May 1, 2013 at 2:29 amOh it looks wonderful Amy! Aren't roman shades the best? So easy to make, and they move so smoothely too!
Anonymous
May 1, 2013 at 1:41 pmGreat tutorial! I'm getting ready to tackle a Roman shade project and your instructions are great. I hope mine turns out as well as yours! Now I just need to decide on fabric.
Amy Sabey
May 1, 2013 at 5:05 pmOkay Friend… I may be at your door but I am going to try this!!!
Debra Hawkins
May 14, 2013 at 3:32 pmLove this! I featured it here: http://www.housewifeeclectic.com/2013/05/creative-showcase-creative-features-and.html