This Wallet Tutorial was originally published 4/26/2011 and was updated on 5/5/2020 and again 9/27/2023.
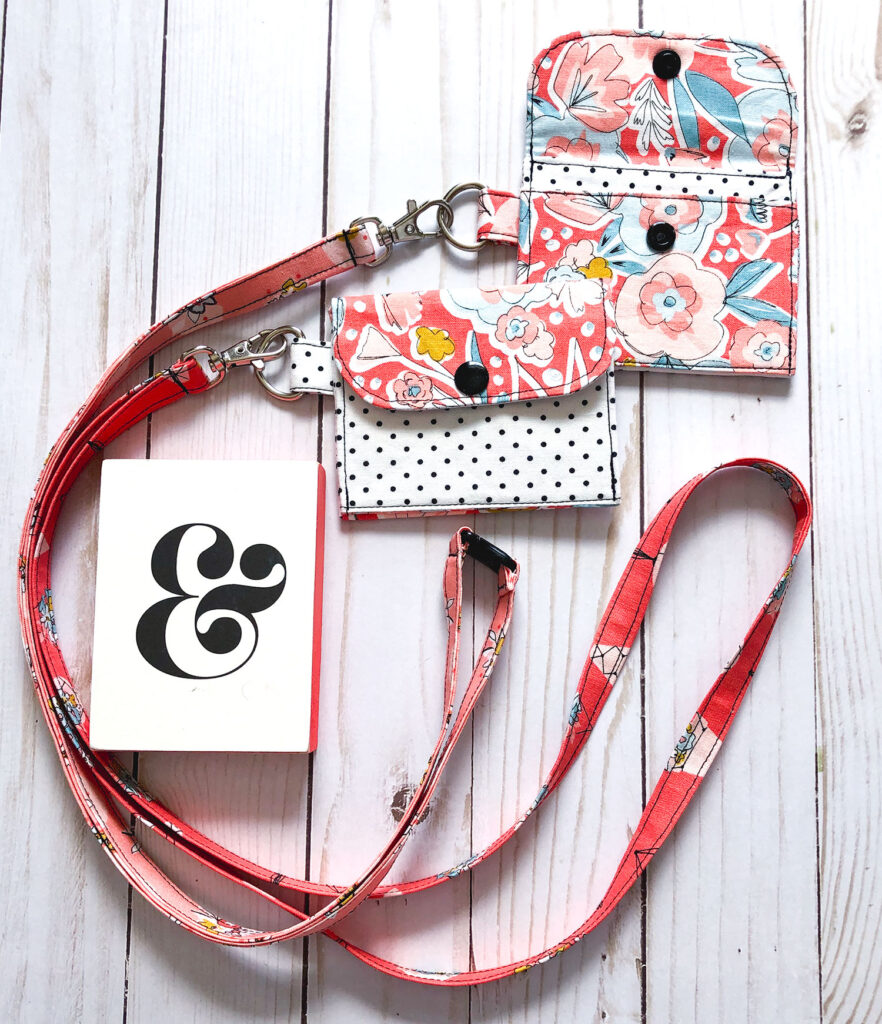
Sometimes you just need something small to get the job done. This mini wallet is one of those times. With a d-ring to attach to a lanyard, two pockets- one for change and one for cash and a small size to minimize bulk, this little project packs a big punch. Whether you want something to throw into a larger bag, a way for kiddos to keep track of their own cash or a small pouch to store your own cards and money this is the wallet for you. The Mini Wallet Tutorial will walk you through each of the steps, and includes three different closure options depending on your preferences and what you have on hand.
Mini Wallet Tutorial
There is a video tutorial for making the wallet on my YouTube channel. It only covers making the snap version, but it is still helpful to see how the project comes together.
Please read all instructions before beginning. The instructions are for all three closure types unless specified. Seam allowances are 1/4″. The wallet finishes at 4″ X 3″ when closed not including the d-ring and strap. The D-ring strap may be omitted if desired. If you would like to use your Cricut Maker to cut out your fabric pieces, you can find the link to the file in this post. If you would like a printable version of this project, you can get it by signing up for my newsletter below:
Fabric, cutting instructions and supplies
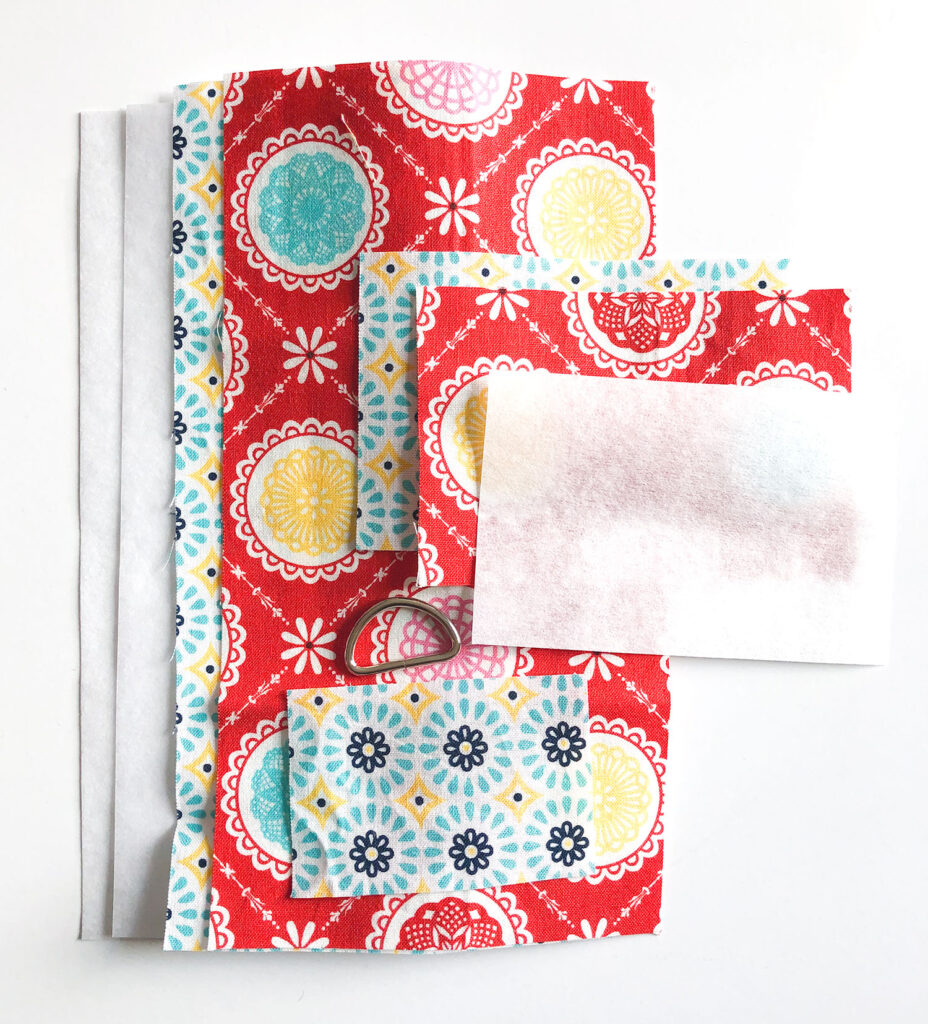
Fabric for this wallet can be prepared in one of two ways, use a rotary blade and ruler to cut the pieces OR print off the pattern and cut your pieces using the pattern. Either way, I recommend printing the pattern to help with rounding the corners, but if you like you can always round the corners by using a lid or other round object.
- You will need fabric for the exterior, interior, d-ring strap (optional) and pocket
- exterior fabric- 1 piece 4 1/2″ X 8 3/4″
- lining fabric- 1 piece 4 1/2″ X 8 3/4″
- pocket exterior fabric- 1 piece 4 1/2″ X 3″
- from pocket lining fabric- 1 piece 4 1/2″ X 3″
- d-ring strap fabric (optional)- 1 piece 2″ X 3″
- Medium Weight interfacing
- For wallet body – 1 piece 4″ X 8 1/4″ (picture shows 2 pieces, but after making a few, one piece is better.
- For pocket- 1 piece 4″ X 2 1/2″
- One 3/4″ d-ring if desired
- closure of choice: set of snaps, 2 1/2″ hook and loop tape or 2″ length of elastic and button
- Pattern for wallet pieces
Prepare Wallet Pieces
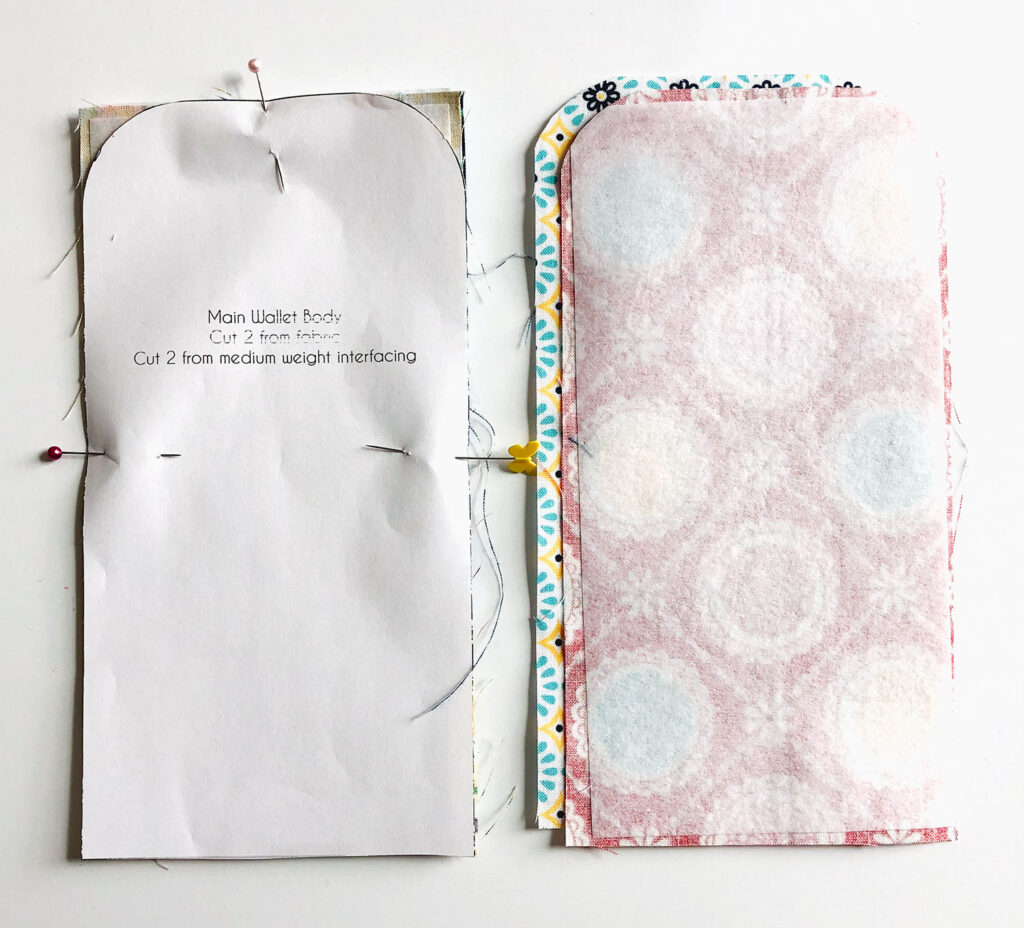
- Fuse the interfacing to the wrong side of the exterior wallet body and pocket pieces.
- Line up the wallet body pieces (exterior and lining) right sides together and pin the pattern piece on top.
- Cut out the wallet body pieces (round the top corners at the very least)
- Press the 2″ x 3″ piece of fabric in half along the 3″ side.
- Open up this fold and bring the raw edges in to the creased line. Press.
- Re-fold the original crease and press again.
- Top stitch along both long sides of your folded strip.
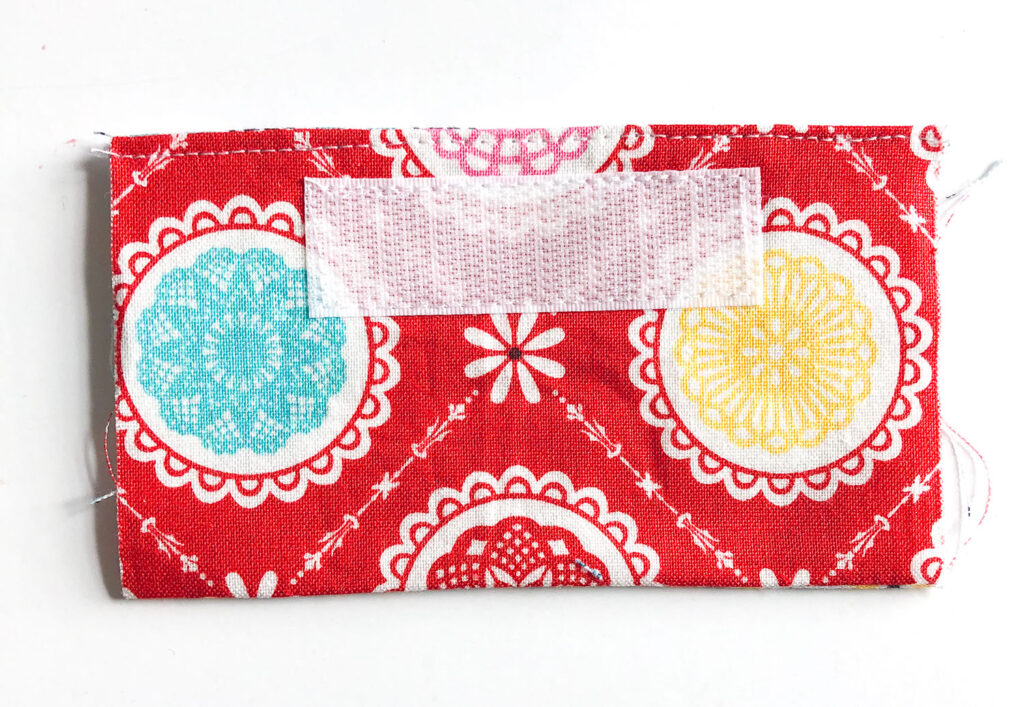
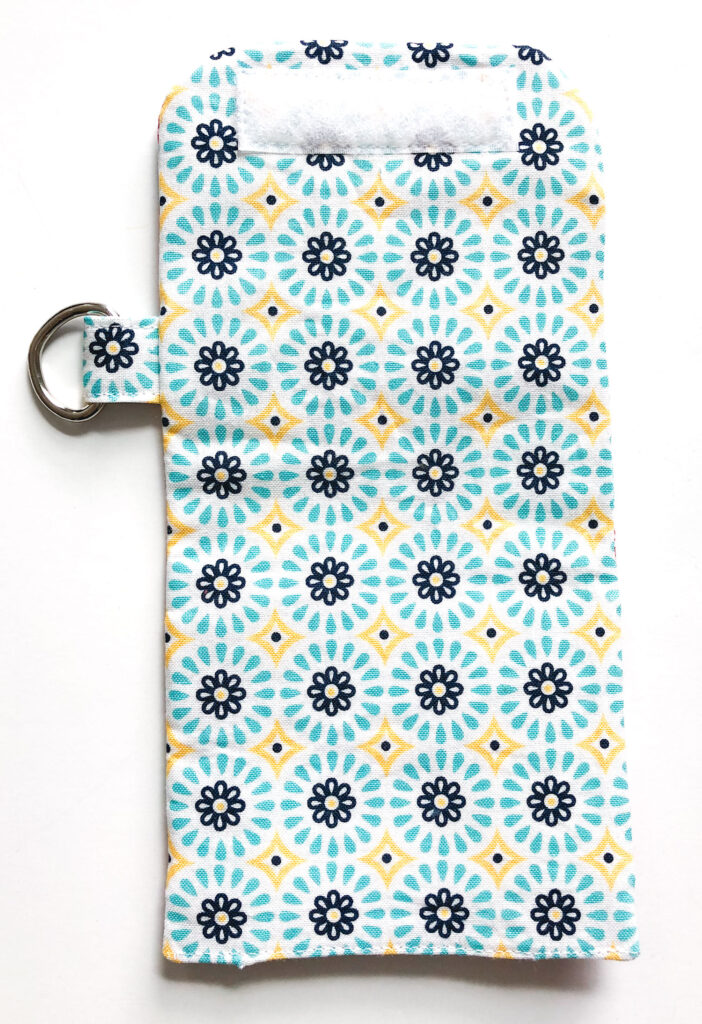
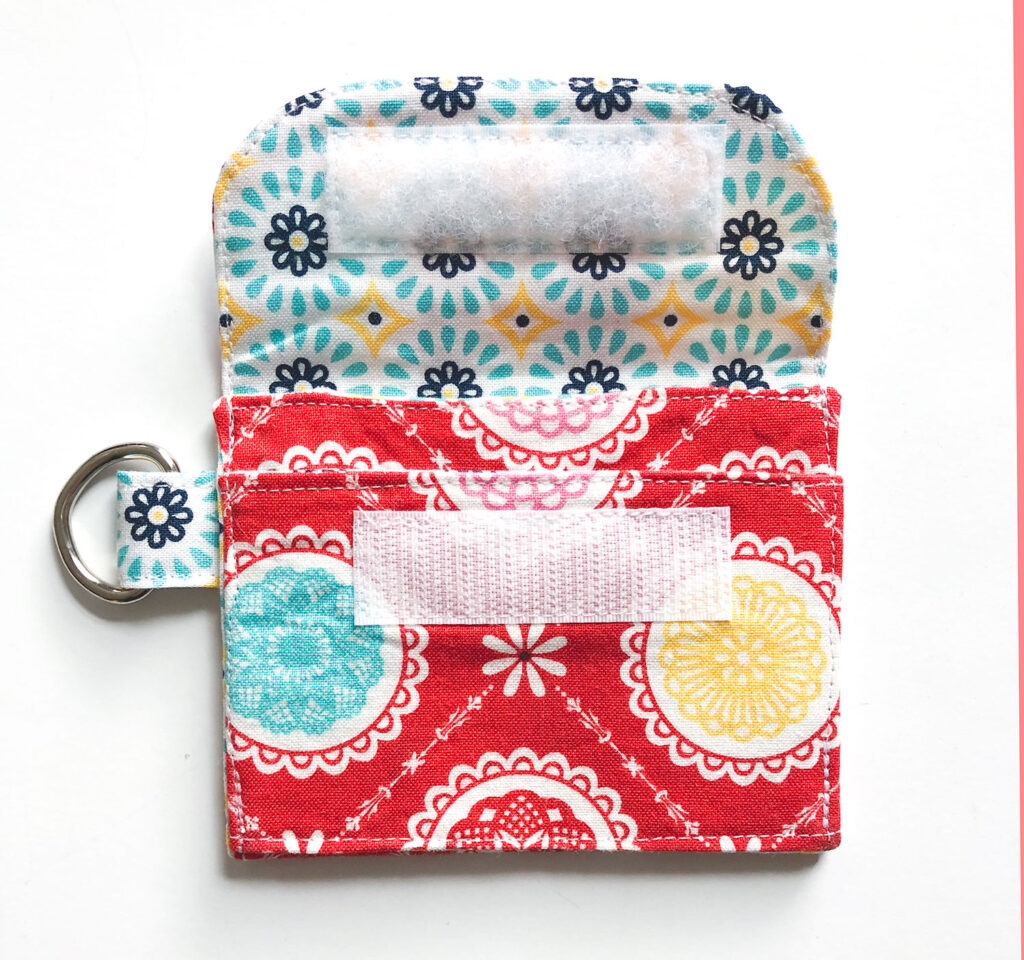
If Using Hook and Loop Closure:
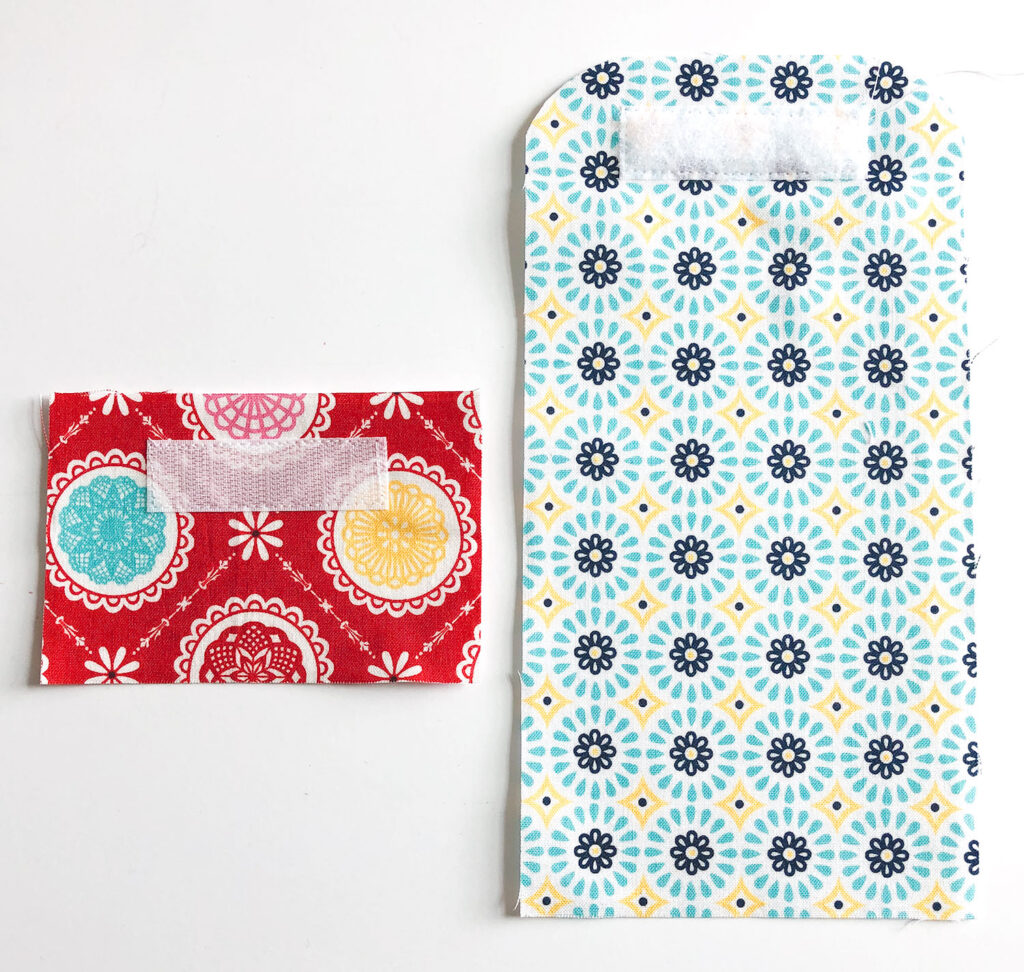
- Center the soft side of the hook and loop tape 1/2″ from the rounded edge on the LINING fabric for the wallet body. Stitch down.
- Center the rough side of the hook and loop tape on the top edge (along the 4 1/2″ side) of the EXTERIOR pocket piece. Stitch down.
Sew Pocket together
- Take the two pocket pieces and place them right sides together.
- Sew along the top and bottom of the pocket (the 4 1/2″ edges) be sure to back stitch at beginning and ending.
- Turn the pocket right side out and press well.
- Top stitch across the top edge of the pocket.
If Using a button and elastic closure:
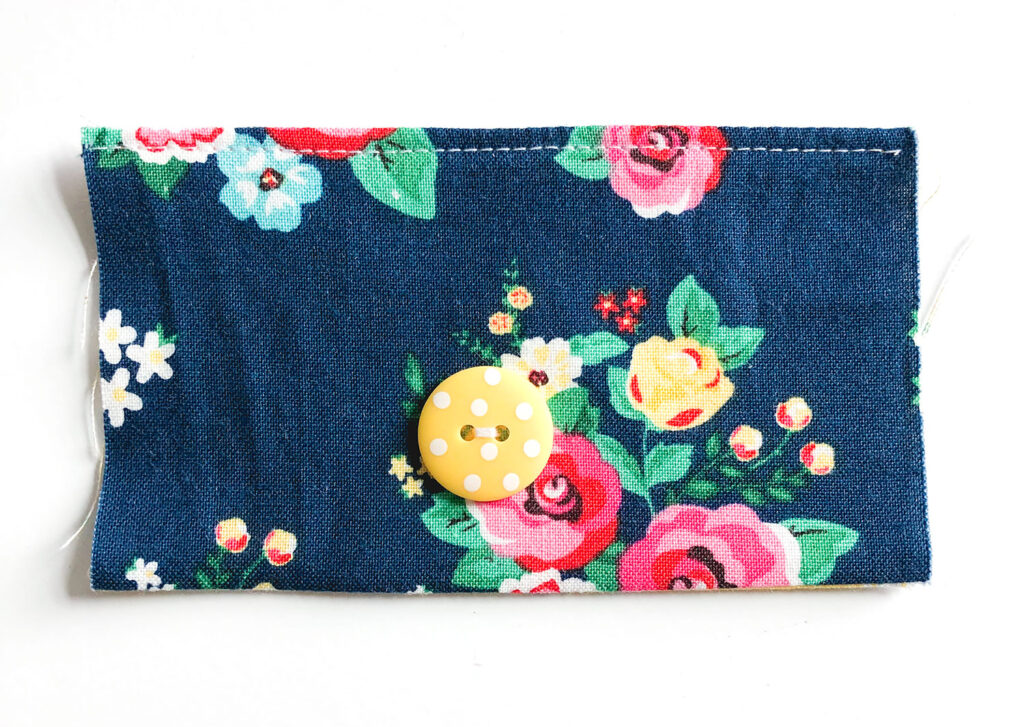
- Center the button on the bottom edge of the pocket piece. For the 1″ button I used, I positioned it 1/2″ above the bottom of the pocket. You may want to adjust the position depending on the size of your button.
Sew Together Mini Wallet
If using Hook and Loop Tape Closure:

- Position the pocket 3/4″ up from the bottom of the exterior of the wallet. The right side of the pocket should be facing out and the hook and loop tape should be toward the bottom.
- Sew down the bottom edge of the pocket. (the side without the top stitching)
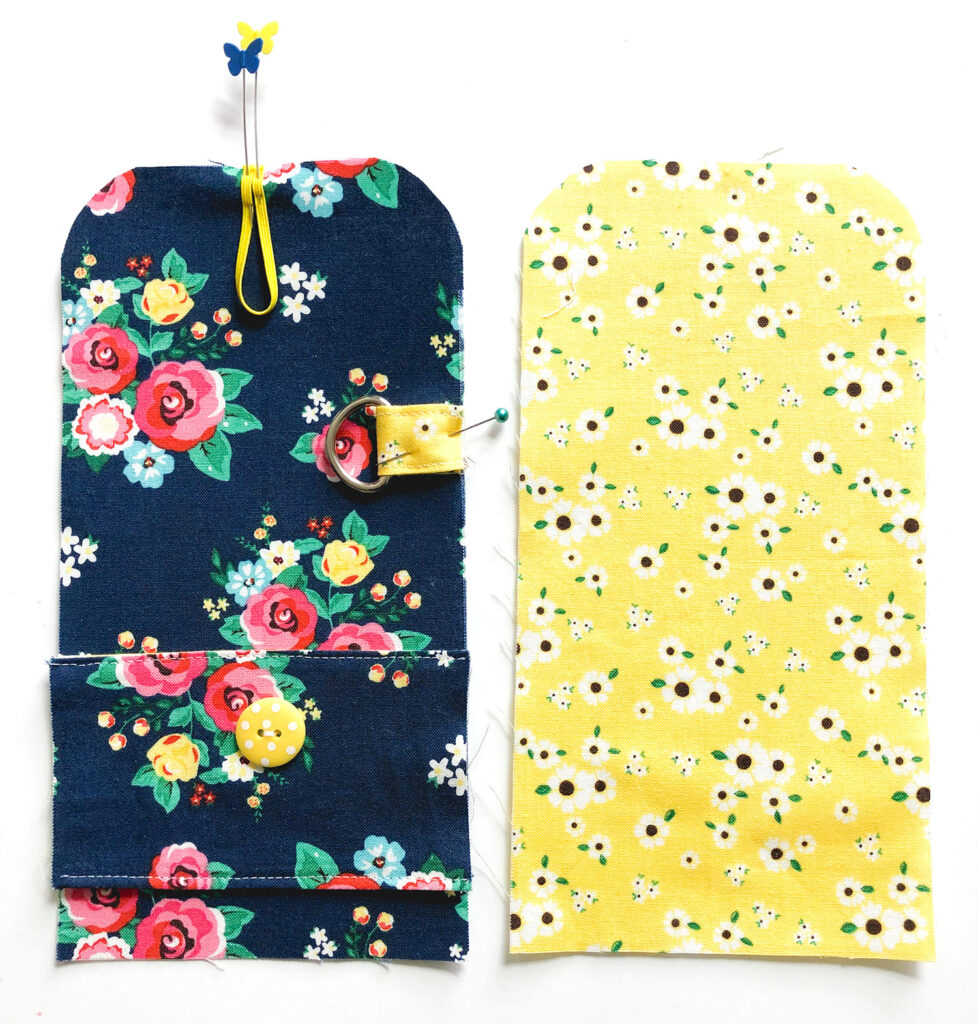
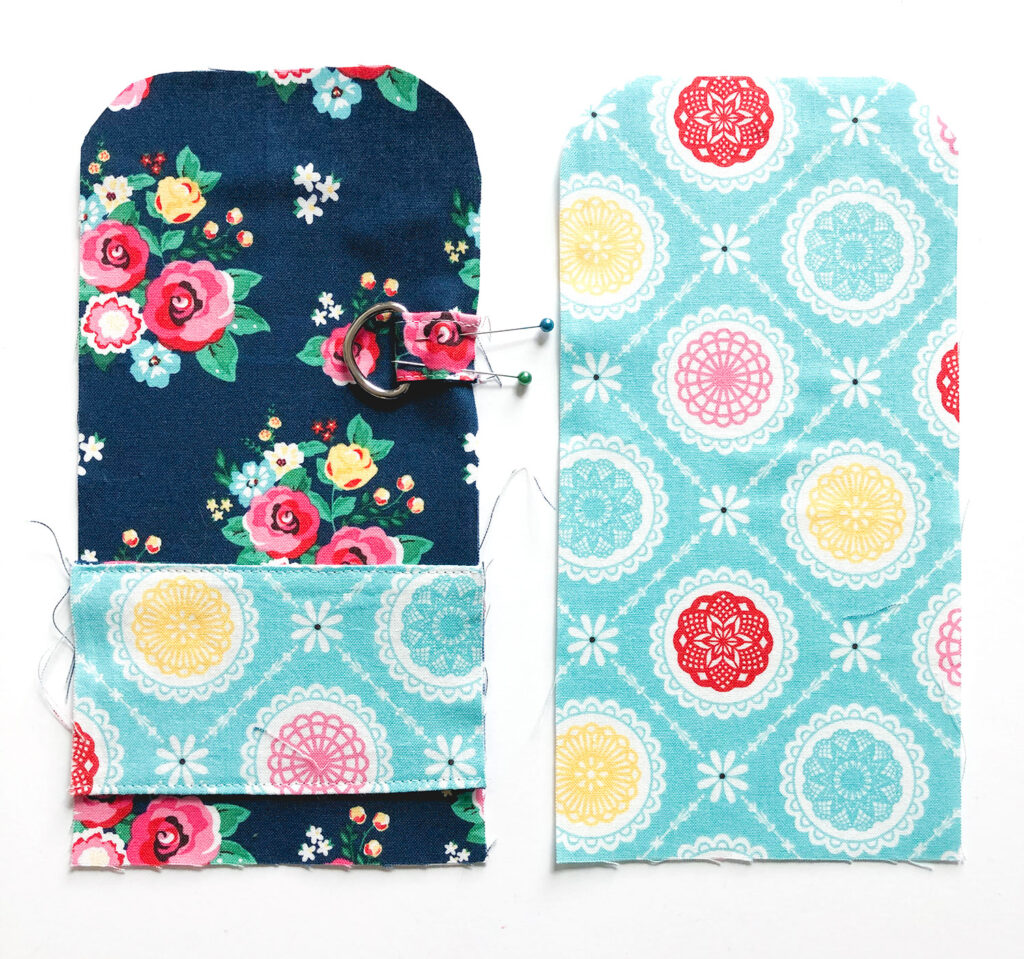
- Fold the d-ring strap in half and slide the straight side of the d-ring into the fold.
- Measure 5 1/4″ up from the bottom of the exterior of the wallet and line up the raw edges of the d-ring strap on the right side of the wallet exterior.
For the button and elastic closure:
- Place the pocket 3/4″ up from the bottom of the exterior of the wallet body, with the top stitched edge toward the bottom of the wallet.
- Then, sew along the bottom edge of the pocket.
- Next, fold the d-ring strap in half and slide the straight edge of the d-ring into the fold.
- Measure 5 1/4″ up from the bottom of the wallet and line up the raw edges of the d-ring strap on the right side of the wallet.
- Finally, fold the 2″ length of elastic in half and position the cut edges at the center of the rounded top of the wallet. Pin into place.
For the Snap Closure:
- Position the top stitched edge of the pocket 3/4″ from the bottom of the wallet exterior.
- Sew along the bottom of the pocket (the side without the top stitching)
- Fold the d-ring strap in half and slide the straight edge of the d-ring into the fold.
- Measure 5 1/4″ up from the bottom of the wallet exterior and line up the raw edges of the d-ring strap on the Right side.
Final Assembly
- Place the lining wallet body piece right side down on the wallet exterior. Pin in place.
- Next, sew around the perimeter of the wallet leaving a 2-3″ opening along the bottom edge for turning.
- Clip the corners and rounded edges. *tip: I use pinking shears on the rounded corners.
- Turn the wallet right side out and press well, folding under the seam allowance of the opening left for turning.
- Top stitch the bottom of the wallet, closing the opening.
- Fold the wallet along the bottom edge of the pocket.
- Top stitch around the wallet starting at the bottom of the pocket, going around the rounded flap and down the other side of the pocket. Back stitch at the beginning and ending of your sewing.
If using the Snap closure:
For a full tutorial on how to insert the plastic snaps into your project, including a video, you can go to this post here.
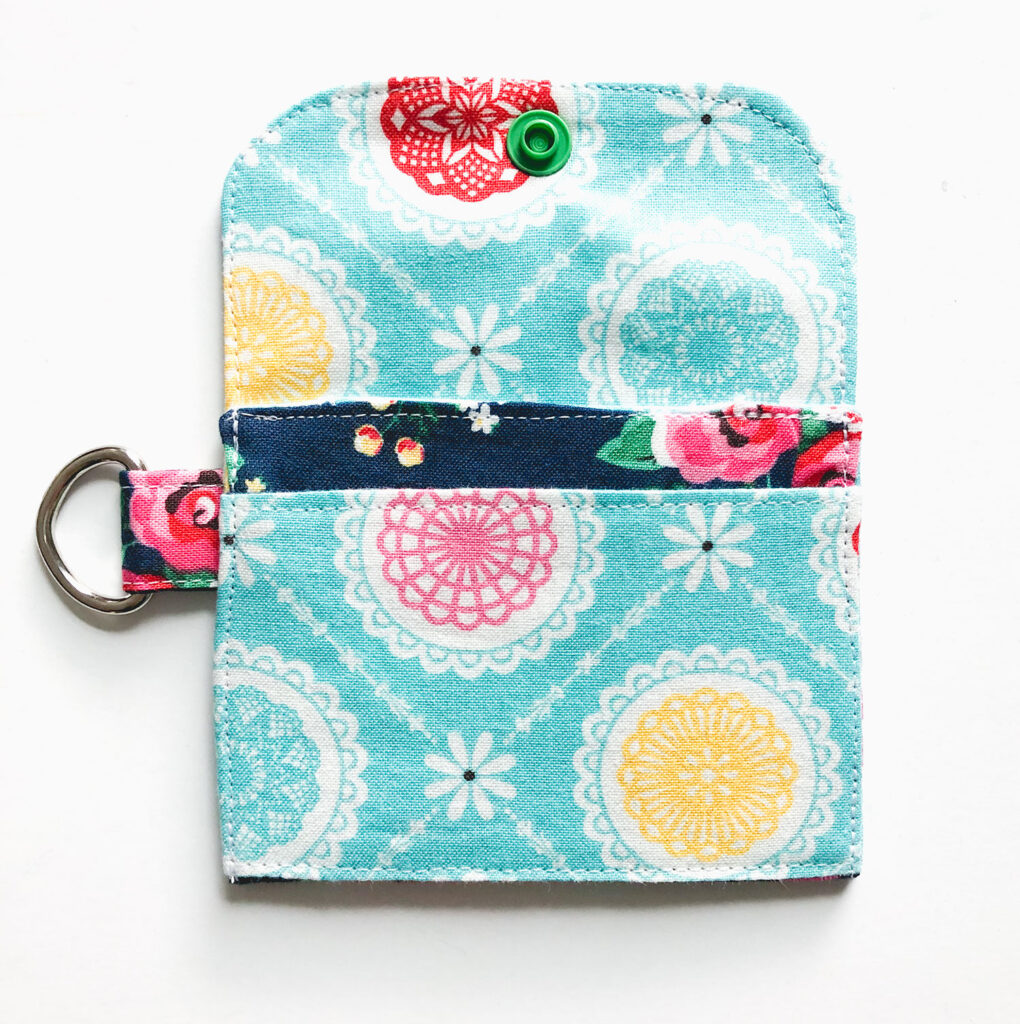
- Measure 1/2″ down from the top of the rounded flap and mark the center.
- Insert the male end of the snap at the mark.
- Fold over the flap and press to mark the placement of the female end of the snap.
- Insert the female end of the snap at the mark.
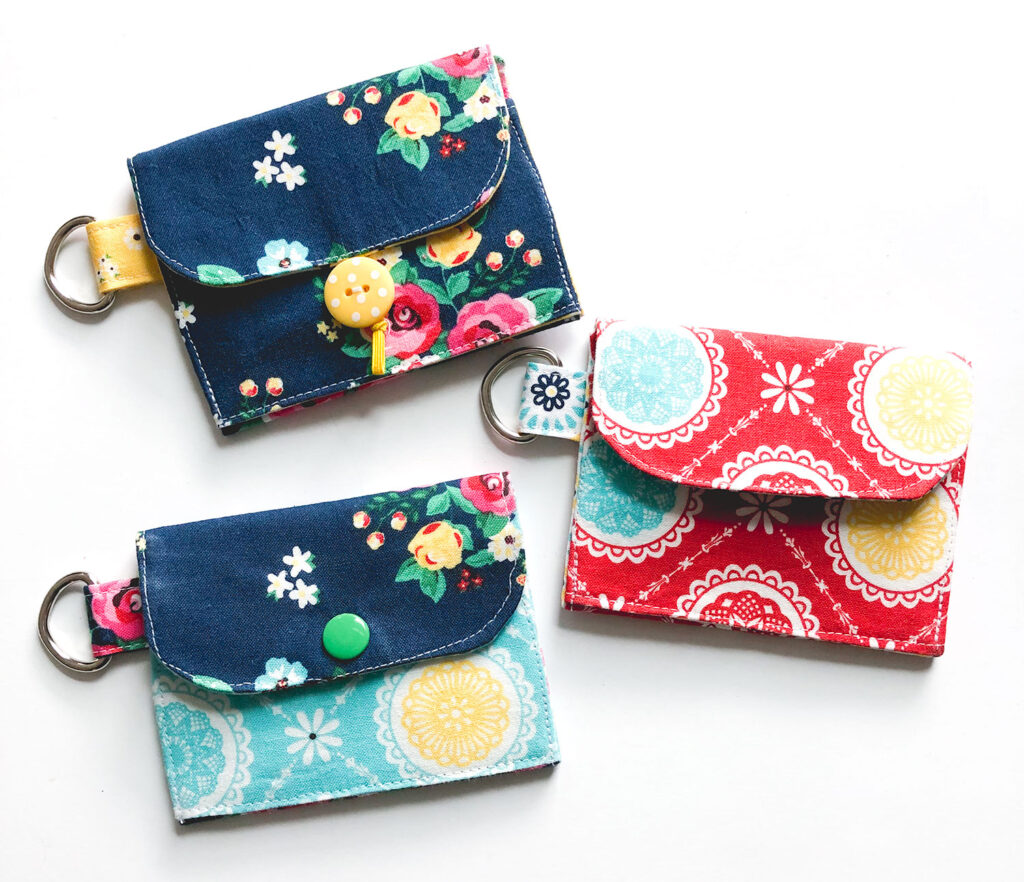
All three closures are easy and fun and add so much personality to the mini wallets. I love using my Kam Snaps because of the many color options, but hook and loop tape and elastic are readily available and simple to use as well so they are all fantastic choices.
I also have tutorials for fabric lanyards or wrist straps if you would like to make one to match your darling new mini wallet.
If you are looking for more tiny things to sew, my mini coin pouch is another fun “little” sew.
What little sewing projects have you been up to lately?
Happy Sewing friends! xoxo, Amy


Kristie
April 26, 2011 at 2:43 pmThank you! I have been looking for a simple one for gifts, and for my little kiddos who love the play cards from the mail!
Tam @ Sew Dang Cute
April 26, 2011 at 9:29 pmAmy! That dollar fabric is so cute and perfect for a wallet! Thanks so much for commenting on my sharing post and I'm so excited to meet you (if you decide to party with us on your bday)!!! And seriously thank you so much for your kind words last night on Twitter. I wasn't kidding when I said it made my week. THANK YOU!!
XOXO
Gypsy Thread
April 26, 2011 at 11:29 pmI love little wallet ideas like this one. It's a great way to use extra bits of fabric from making a purse. Matching accessories and all that… 🙂
Lu
April 27, 2011 at 4:05 amSo cute! Great tutorial.
Gwen @ Gwenny Penny
April 27, 2011 at 5:28 amLove this little wallet and had completely forgotten about your post on Less Cake {more Frosting}. I'm making Hello Kitty zipper pouches for the two little girls attending my oldest's birthday party in June and have been looking for something to make for my nephew so he doesn't feel left out. I think I just found it 🙂
casserole
April 27, 2011 at 1:23 pmLove it!! I linked to your tutorial on Craft Gossip Sewing:
http://sewing.craftgossip.com/tutorial-simple-fabric-wallet/2011/04/27/
–Anne
Lolly Jane
April 30, 2011 at 4:18 pmToo cute! I need a new wallet and this is the perfect size. Great tute! We would ♥ for you to show this off at our link party!
Lolly Jane
lollyjaneboutique.blogspot.com
Alicia @ littlesprinklesoffun
May 1, 2011 at 3:37 amToo cute! I love the pink one!
Heather
May 9, 2011 at 3:46 pmThank you for the tutorial! I made one for a birthday gift for a 5 year old. Came out perfect! I posted a pic of the one I made with a following post of the link to this tutorial!
jaya pratheesh
May 19, 2011 at 4:51 pmperfect wallet.. very clear tutorial. thank you!
SJ @ Homemaker On A Dime
May 23, 2011 at 2:41 pmHi, friend! I'm admiring all your creative posts here so can you please share them with us at the Creative Bloggers' Party & Hop? Hope to see you there at the party 🙂
The Best DIY Fat Quarter Projects | Best 10 Diy
May 18, 2020 at 4:25 pm[…] MINI WALLET TUTORIAL […]