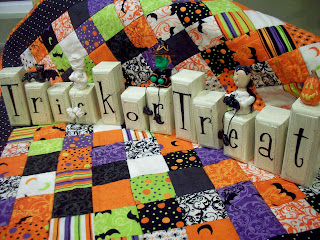
 When I went back through my posts, I couldn’t believe that I had never posted about my Trick or Treat blocks! I have been making these for a couple of years and I love them. It started when my sister had some left over 2X2 posts from building her new deck. I knew I could do something with them, so these blocks were born. First I cut them to size, used the router on the edges to give them a “face”, and did a three step paint treatment using crackle medium. Then I printed the letters off my computer, hand cut them out and mod podged them on. I actually used mod podge all over the block to give them a glossy finish. I decided the blocks looked kind of plain, so I started making the figurines to go on them. They are sculpted by hand out of polymer clay and then I actually used mod podge on them as well, for that same glossy finish.
Here are some closer views:

 Just right for a not-so-spooky Halloween decoration. 😉
check out more mod podge projects here:


Mel
September 3, 2010 at 4:58 amA great project. The Halloween characters you made are fabulous.
Sonya@Beyond the Screen Door
September 11, 2010 at 1:29 amThese blocks are so cute and simple! What a great addition to your halloween decor. Your "people" are adorable! Thanks for sharing!
Amy C
September 11, 2010 at 1:38 amThese are absolutely adorable! I think word blocks are one of my favorite holiday decorations!
Alison
September 11, 2010 at 3:50 amThese are so darling!! What a fun Halloween decoration idea!!!
~Alison
http://oopsey-daisy.blogspot.com/
Katie's Nesting Spot
September 11, 2010 at 5:30 amGreat decoration I didn't realize you made them entirely from scratch until I read the description a little more closely. How fun that you even made the figures! Would love you to join me at A Crafty Soiree, every Thursday.
Erin
September 11, 2010 at 2:46 pmThese are adorable! Very clever.
http://www.makingmemorieswithyourkids.blogspot.com
Santa's Gift Shoppe and Ideas
September 11, 2010 at 4:45 pmYou did a great job..they are really cute!!Hi..I’m Barb..I am your newest follower. I hope you will get a chance to visit my blog @ santasgiftshoppe.blogspot.com
& get inspired by something for your family/home. I hope you will follow me as well. I also would love for you to be a new Fan of my Facebook page too & click “LIKE” in the upper right hand corner of my blog & you’ve done it..Thanks so much! I am just starting at Facebook. Nice to meet ya new friend!!!
Kim
September 11, 2010 at 9:55 pmThese are adorable! What is the three step crackle treatment? Maybe I'll try to make some . . . though I'm not sure I dare to try and make figurines . . . I was never that good with playdo as a kid, and I'm worse with that kind of thing now!! 🙂
Amy
September 16, 2010 at 7:47 pmTo create a crackle finish, first paint the wood the color you want to peek out the cracks (in this case black). Then you paint on the crackle medium. you can find it at most craft store, even wal-mart carries it in the craft section in my city. When that dries, you paint the top color on. As it dries, the crackles show up and you have a spooky finish!
Sandy Ang
September 18, 2010 at 12:53 amJust so cute !